Ballerina nail art offers a chic, elongated silhouette that’s surprisingly easy to achieve. From classic solids to dazzling designs, these ideas are perfect for beginners and pros alike, making your fingertips pop with elegance.
Ever look at perfectly shaped nails and wonder if you can achieve that same sophisticated look at home? You’re not alone! Getting that flawless, tapered finish can seem intimidating, but I’m here to show you that beautiful ballerina nails are totally within reach. Forget complicated techniques – we’re talking simple, stunning styles that will make you feel fabulous.
This guide is your new go-to for all things ballerina nail art. We’ll dive into essential ideas, easy tips, and how to make these elegant shapes work for you. Get ready to transform your nails into tiny works of art!
What Exactly Are Ballerina Nails?
Ballerina nails, also known as coffin nails, are characterized by their long, tapered sides and typically a straight, squared-off tip. The shape is designed to flatter the fingers, making them appear longer and more slender. Think of a dancer’s pointe shoe – hence the name! This shape is super popular because it’s both elegant and modern, suiting a wide range of nail art designs.
Why Choose Ballerina Nails?
Ballerina nails are a fantastic choice for several reasons:
- Flattering Silhouette: They elongate the fingers beautifully, giving that sophisticated look.
- Versatile Canvas: The long, straight edges provide ample space for creative nail art.
- Modern & Chic: This shape is a timeless trend that always looks stylish.
- Durable Shape: When done properly, the squared-off tip can be less prone to snagging compared to stiletto nails.
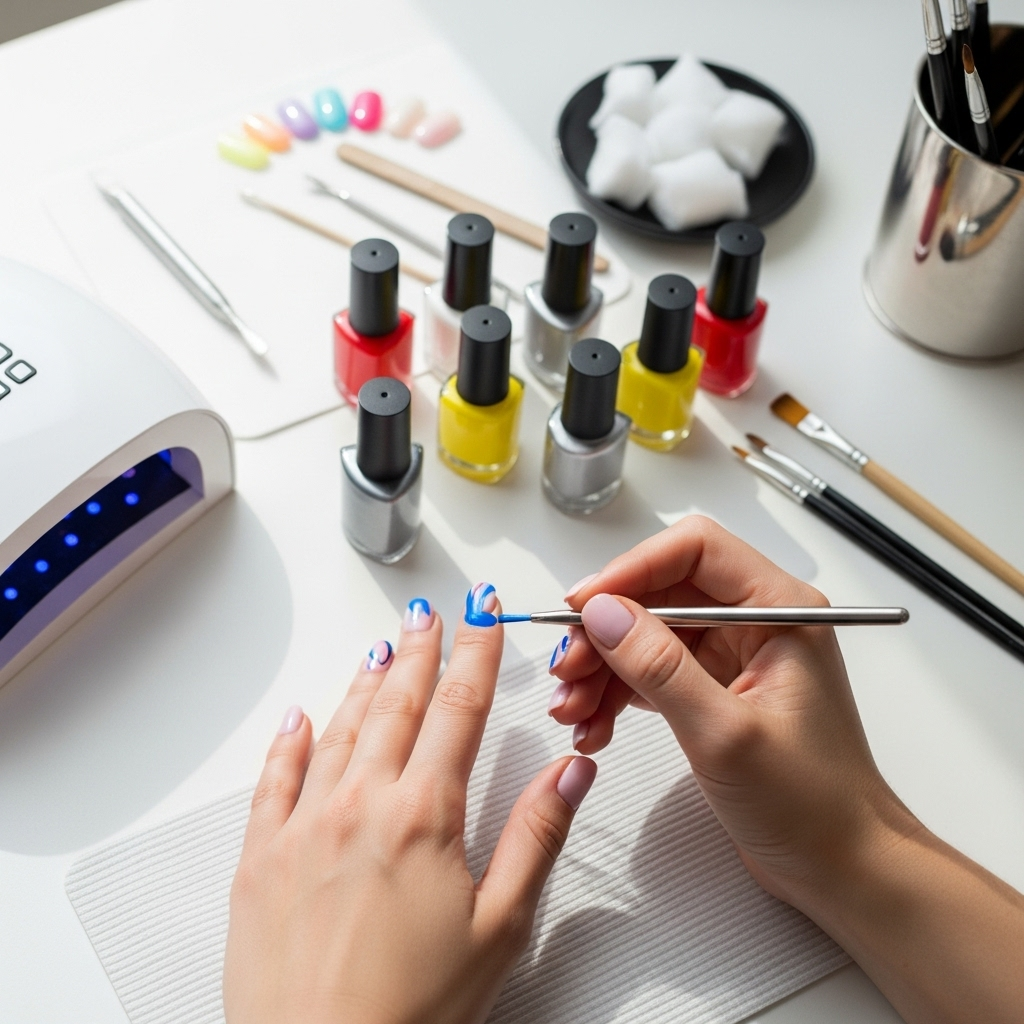
Essential Tools for Ballerina Nail Art
Before we jump into the fun designs, let’s gather our nail art toolkit. Don’t worry, you don’t need a salon in your home! These are the basics that will help you achieve salon-worthy results:
- Nail Clippers: For the initial shaping.
- Nail File (Medium and Fine Grit): Crucial for shaping and smoothing. A 180-grit file is great for shaping, and a 220-grit or higher is good for smoothing.
- Glass or Crystal Nail File: These are excellent for sealing the edges of your natural nails, reducing splitting and chipping. You can find quality ones from brands like Mont Bleu.
- Buffer Block: To smooth the nail surface and prepare it for polish.
- Cuticle Pusher/Orange Stick: To gently push back and care for your cuticles.
- Base Coat: Protects your natural nails and helps polish adhere.
- Top Coat: Seals your design and adds shine. Consider a quick-dry top coat to save time!
- Nail Polish/Gel Polish: Your chosen colors!
- Dotting Tools or Toothpicks: For creating small dots and simple designs.
- Thin Nail Art Brushes: Essential for drawing lines, details, and intricate patterns.
- Dotting Swirl/Marble Tool: For creating marble effects and swirling colors.
- Tweezers: For placing rhinestones, glitter, or decals precisely.
- Nail Polish Remover & Cotton Pads: For clean-ups and starting fresh.
How to Shape Your Nails into Ballerinas (Beginner-Friendly!)
Ready to give your nails that signature ballerina shape? It’s easier than you think! Follow these simple steps:
Step 1: Prep Your Nails
Start with clean, dry nails. Remove any old polish. Gently push back your cuticles with a cuticle pusher or orange stick. If you have any rough edges or hangnails, carefully trim them with cuticle nippers.
Step 2: Trim to Desired Length
Using your nail clippers, trim your nails to your desired length. It’s easier to shape longer nails, so don’t cut them too short at this stage. Remember, ballerina nails are typically long, so leave some room to work with.
Step 3: Shape the Sides
This is where the magic happens! Take your medium-grit nail file (around 180 grit is good here). At a slight angle, start filing the sides of your nail towards the center. You want to create a gentle taper, narrowing the nail as you move towards the tip. File from one side to the other, always filing in one direction to avoid weakening the nail. Repeat on the other side, making sure the tapers meet smoothly.
Step 4: Straighten the Tip
Now, use the same file to create a straight, squared-off tip. File across the very end of the nail. Aim for a clean, crisp line. Don’t make it too sharp or deep initially, as you can refine it.
Step 5: Smooth and Refine
Use your fine-grit file or a buffer block to smooth out any rough edges. Gently file the entire nail surface to ensure it’s smooth, and refine the taper and the squared tip. A glass nail file is excellent for this final smoothing stage, as it helps seal the nail edge. You can learn more about effective nail filing techniques from resources like the American Academy of Dermatology.
Step 6: Buff and Cleanse
Use your buffer block to gently buff the entire nail surface. This removes any filing dust and creates a perfect base for your polish. Wipe your nails with a lint-free cloth or a brush to remove all dust. Apply your base coat and let it dry completely.
Stunning Ballerina Nail Art Ideas for Every Style
Now for the fun part – decorating! Ballerina nails are incredibly versatile. Here are some essential ideas to inspire your next manicure:
1. Classic Solid Colors
Sometimes, simplicity is key. A beautifully shaped ballerina nail in a classic solid color is timeless. Think:
- Deep Reds & Burgundies: Perfect for a sophisticated look, especially in cooler months.
- Nudes & Neutrals: Effortlessly chic, elongating your fingers even further.
- Classic Black: Bold, edgy, and always in style.
- Pastel Shades: Soft and pretty, ideal for spring and summer.
Pro Tip: Ensure your polish application is neat, with even coats, to truly showcase the shape.
2. French Manicure with a Twist
The French manicure gets a modern update on ballerina nails. Instead of a traditional rounded tip, a crisp white line across the squared-off tip is super sharp and stylish. You can also play with different colors for the tip, like black, gold, or even a glittery shade.
Table: Ballerina French Tip Variations
| Variation | Description | Occasion Suitability |
|---|---|---|
| Classic White Tip | A clean, sharp white line across the squared tip. | Everyday, Formal, Professional |
| Colored Tip | Replace white with black, navy, metallic, or a bold bright. | Casual, Trendy, Evening |
| Glitter Tip | A strip of glitter polish or fine glitter applied to the tip. | Party, Festive, Glamorous |
| Double French | Two thin lines of different colors on the tip. | Fashion-forward, Bold |
3. Ombre & Gradient Effects
The elongated shape of ballerina nails is perfect for showcasing ombre designs. Blend two or more colors seamlessly from the cuticle to the tip for a smooth, captivating look. Popular blends include:
- Pink to white (classic baby boomer)
- Nude to a bolder color
- Two complementary colors
4. Glitter & Sparkle
Who doesn’t love a bit of sparkle? Glitter is a fantastic way to glam up ballerina nails. You can:
- Apply a full glitter polish for a dazzling effect.
- Use glitter on accent nails.
- Create a glitter gradient at the tips or cuticle.
- Add fine glitter accents over solid colors.
Tip: For a smooth glitter finish, apply a clear top coat, sprinkle fine glitter over the wet coat, let dry, then seal with another top coat.
5. Minimalist Designs
Subtle details can make a big impact. Minimalist designs are chic and sophisticated on ballerina nails:
- Single Dot: A tiny black or metallic dot near the cuticle.
- Thin Line: A delicate line drawn horizontally near the tip or vertically down the center.
- Geometric Shapes: Small triangles, squares, or stripes.
- Negative Space: Incorporate unpolished areas for a modern, airy feel.
6. Floral & Botanical Art
Think delicate flowers, vines, or leaves. These details look stunning on the long canvas of ballerina nails. You can paint them by hand with fine brushes or use nail stickers and decals for an easier application.
7. Animal Prints
Leopard spots, zebra stripes, or snake scales can add a fierce and trendy vibe to your ballerina nails. Keep it classic with black and white or gold, or get creative with colored variations.
8. Rhinestones & Embellishments
Add some bling! A few strategically placed rhinestones, pearls, or studs can elevate your ballerina nails to red-carpet status. Focus on the cuticle area, the tip, or create a small cluster for maximum impact.
9. Two-Tone & Color Blocking
Divide the nail into two sections and paint each with a different color. This can be done vertically, horizontally, or diagonally. Contrasting colors create a bold statement, while tonal shades offer a more subtle, chic look.
10. Marble Effect
Create a luxurious marble effect using a marbling tool or a simple swirling technique with polishes. White and gray, or black and white are classic, but you can also try colorful marble designs.
Maintaining Your Ballerina Nails
To keep your ballerina nails looking their best:
- Moisturize: Use cuticle oil daily to keep your cuticles and nail beds hydrated. This also makes your manicure look fresher.
- Wear Gloves: Protect your nails from harsh chemicals when doing chores by wearing rubber gloves.
- Avoid Using Nails as Tools: Don’t use your nails to pry, scrape, or tap.
- Touch-Ups: Be prepared for slight reshaping at the tips if they show wear. A fine file can do wonders.
- Reapply Top Coat: A fresh layer of top coat every few days can revive shine and protect your polish. For gel manicures, this is less of a concern.
Ballerina Nail Shapes vs. Other Popular Nail Shapes
It’s helpful to see how ballerina nails compare to other trendy shapes:
Table: Ballerina vs. Other Nail Shapes
| Shape | Description | Key Differences | Best For |
|---|---|---|---|
| Ballerina/Coffin | Tapered sides, straight squared-off tip. | Squared-off tip is definitive. | Long fingers, showcasing art, modern look. |
| Stiletto | Tapered sides, sharp pointed tip. | Sharp, pointed tip. Needs strong nails. | Dramatic effect, very long nails. |
| Almond | Sides taper gradually to a rounded, soft point. | Rounded, softer point than stiletto. | Flattering on most hands, elegant. |
| Square | Straight sides, sharp squared-off tip with no tapering. | No tapering on sides, straight edges. | Shorter nails, classic look, strong nails. |
| Squoval | Straight sides, rounded corners for the tip. | Softened squared tip. | Practical, classic, less prone to snagging. |
Frequently Asked Questions (FAQ)
What is the best way to file for ballerina nails?
For ballerina nails, file the sides inward at a slight angle to create the taper, then use straight, side-to-side strokes across the tip to create the squared-off edge. Always file in one direction to prevent nail damage.
Can I get ballerina nails with short nails?
It’s challenging to achieve a true ballerina shape with very short natural nails because there isn’t enough length for the taper and the squared tip. Ballerina nails are best suited for medium to long nails. If you have short nails, you might consider press-on nails or extensions.
How do I prevent my ballerina nails from breaking?
Ensure your nails are properly shaped and smoothed, especially at the tip, to reduce weak points. Always use a good base and top coat. For natural nails, consider using a nail hardener or strengthening treatment. Avoid using your nails as tools for prying or scraping.
Are ballerina nails good for gel polish?
Yes! Ballerina nails are an excellent shape for gel polish. The smooth, long surface provides a great canvas for gel colors, intricate designs, and durable finishes. Gel polish can also add strength to the nail, making them less prone to breakage.
How often should I reshape my ballerina nails?
This depends on your nail growth rate and how you treat your nails. Typically, you might want to do a light reshaping every 1-2 weeks to maintain the clean lines and shape as your nails grow out.
Can I do ballerina nail art on acrylics or extensions?
Absolutely! Acrylics and nail extensions are a fantastic way to achieve the perfect ballerina shape, especially if your natural nails aren’t long enough. They provide a strong base for any nail art design you can imagine.
Conclusion
Ballerina nail art is a world of elegance and creativity waiting for you to explore. Whether you love a bold solid color, a delicate floral design, or a sparkling glitter accent, this versatile shape is a perfect canvas. You’ve learned how to shape them yourself, gathered your essential tools, and discovered stunning design ideas. Remember, nail art is all about self-expression, so have fun with it! Your nails are a fantastic way to show off your unique style, and with these tips and ideas, you’re ready to create some truly breathtaking ballerina manicures.