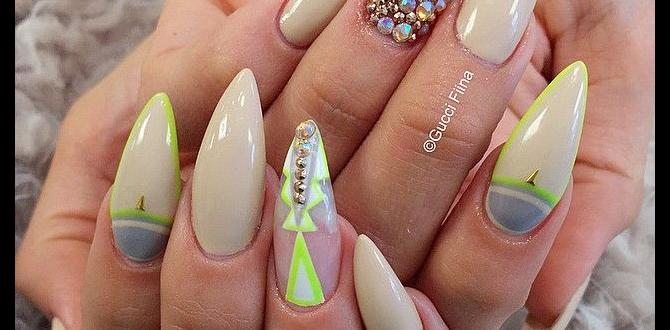
To apply rhinestones on nails properly for a long-lasting, dazzling effect, use a strong nail glue or gel, a precision applicator tool, and a durable topcoat. This guide breaks down the simple steps to achieve a professional-looking sparkle that stays put, ensuring your nail art creation shines.
Dreaming of nails that sparkle and shine like a disco ball? Rhinestones are a fantastic way to add some serious bling to your manicure, but getting them to stay put can feel like a bit of a challenge. You’ve probably had those moments where a precious rhinestone pops off just as you’re heading out the door, leaving behind a sad little bare spot! Don’t worry, we’ve all been there. With the right techniques and a few key tools, you can easily master the art of applying rhinestones so they look fabulous for as long as you want them to. Get ready to elevate your nail game and express your unique style with these brilliant tips!
Sparkle with Confidence: Your Beginner’s Guide to Applying Rhinestones on Nails
Adding rhinestones to your nails is like adding the perfect accessory to an outfit – it’s the finishing touch that makes everything pop! Whether you’re aiming for a subtle shimmer or a full-on dazzling display, knowing how to apply them correctly is key to achieving a professional and long-lasting result. This guide is designed for you, the blossoming nail art enthusiast, to walk you through every step with ease and encourage your creativity. We’ll cover everything from choosing the right glue to securing those tiny gems so they stay put through your busy day. Let’s dive in and make your nails the star of the show!
What You’ll Need: Your Rhinestone Application Toolkit
Before we start sticking, let’s gather our supplies. Having the right tools makes all the difference in achieving a neat, professional finish. Think of this as assembling your artist’s palette for nail art!
Here’s what you’ll want to have on hand:
- Nail Polish or Gel Polish: Your base color is the canvas!
- Top Coat: A good quality, non-wipe top coat is ideal for sealing.
- Nail Glue or Strong Nail Adhesive: Some rhinestones can be applied with specific nail glue; others need builder gel or acrylic. For beginners, a strong nail adhesive designed for gems is a good start.
- Rhinestones: Available in countless sizes, shapes, and colors. Crystal AB (Aurora Borealis) is a popular choice for its iridescent shine.
- Applicator Tool: This is crucial for picking up tiny stones. Options include:
- Wax Pencil/Dotting Tool: The waxy tip picks up stones easily.
- Tweezers: Fine-tipped tweezers offer precision.
- Rhinestone Picker Tool: Many beauty brands offer specialized tools with a sticky or waxy end.
- Rubbing Alcohol or Nail Cleanser: To ensure a clean nail surface.
- Optional: Base coat, regular polish colors, UV/LED Lamp (if using gel polish).
Step-by-Step: Applying Rhinestones Like a Pro
Ready to add some serious sparkle? Follow these simple steps to apply your rhinestones beautifully and make them last:
Step 1: Prep Your Nails for Perfection
Just like any great artwork, a clean and smooth surface is essential. Start by cleaning your nails thoroughly. Remove any old polish, shape your nails, and push back your cuticles. For a long-lasting manicure, ensure your nails are completely free of oils and dust. Wipe each nail with rubbing alcohol or a nail cleanser to create a pristine canvas.
Step 2: Apply Your Base Nail Color
Paint your nails with your chosen nail polish or gel polish. Apply one or two thin coats, allowing each to dry completely according to the product instructions. If you’re using gel polish, cure each coat under a UV/LED lamp as directed.
Step 3: Choose Your Adhesive Method
This is where the magic happens! There are a few tried-and-true methods for attaching your rhinestones.
- Using Nail Glue: This is a straightforward method for standalone rhinestones on regular polish or gel.
- Place a tiny dot of nail glue where you want your rhinestone to go. Don’t use too much, or it will spread and look messy!
- Immediately pick up a rhinestone with your applicator tool and gently press it into the glue dot.
- Hold for a few seconds to ensure it adheres.
- Using Gel Polish/Builder Gel: This method integrates the rhinestone into your gel manicure for a super strong hold.
- Apply a thin layer of gel polish or builder gel to the area where you want to place the rhinestone. For maximum hold, some nail techs will apply a thin layer of builder gel over the entire nail surface or just the accent nail, then place the stones into the uncured gel.
- Gently press the rhinestone into the uncured gel with your applicator tool.
- Once all your stones are in place, cure the entire nail under your UV/LED lamp according to the gel manufacturer’s instructions.
Step 4: Place Your Rhinestones with Precision
Now for the fun part – placing the bling! Dip the tip of your wax pencil, dotting tool, tweezers, or specialized applicator into your chosen adhesive (if using the dotting tool method). Gently pick up a rhinestone and carefully position it onto your nail, pressing it slightly into the glue or gel.
Pro Tip: Start with one rhinestone at a time. Once you get comfortable, you can place multiple stones to create patterns or borders. For a cohesive look, consider the size and shape of your nail bed when planning your rhinestone design. A visit to the Association of American Medical Colleges glossary might give you ideas on scale, but for nails, think playfully!
Step 5: Seal the Sparkle for Longevity
This is a critical step to ensure your beautiful rhinestones don’t go rogue! Once your rhinestones are in place and the adhesive has set (or after curing gel), it’s time to seal them in.
- For Regular Nail Polish: Carefully apply a thin layer of top coat around the rhinestones. Try to avoid flooding the stones, which can dull their sparkle. You can use your fine-tipped brush or applicator tool to guide the top coat into nooks and crannies. Some people prefer to encapsulate the stones by applying the top coat only on the nail surface around the stone.
- For Gel Polish: If you used a gel adhesive, once cured, you can apply a thin layer of non-wipe gel top coat over your entire nail, carefully painting around the rhinestones to preserve their shine. Alternatively, you can brush the top coat very carefully up to the edge of each stone. Some nail artists prefer to apply top coat only on the nail surface between stones and let the cured gel hold them in place. For maximum durability, some apply a non-wipe top coat and then use their fine-tipped brush to carefully apply a tiny bit of top coat to the side of each rhinestone, securing its edges without covering the top.
Important Note: If using a standard wipe-off gel top coat, you’ll need to cleanse the sticky residue from your nails after curing. This usually requires wiping with a lint-free pad soaked in rubbing alcohol. If you’re using a non-wipe top coat, you can skip this cleansing step!
Choosing the Right Adhesive: A Deeper Dive
The type of adhesive you use significantly impacts how well your rhinestones will stick. Let’s explore the best options for different scenarios.
Nail Glue vs. Gel/Acrylics
Here’s a quick comparison:
| Adhesive Type | Best For | Pros | Cons |
|---|---|---|---|
| Regular Nail Glue (Designed for gems/rhinestones) |
Regular nail polish, casual wear, beginners | Quick application, readily available, good for small accents | May not last as long as gel/acrylic, can yellow over time, prone to chipping if not sealed well |
| Gel Polish (Builder Gel/Sticker Glue) | Gel manicures, longer-lasting wear, creating 3D designs | Excellent adhesion, long-lasting, integrates with gel system, creates a smooth surface | Requires UV/LED lamp, slightly more technique involved, can be bulkier if not applied carefully |
| Acrylic | Acrylic nail sets, advanced nail art, very durable designs | Extremely strong hold, can be used to sculpt and embed stones | Requires specialized monomers/powders, advanced skill level, can be damaging if removed incorrectly. For professional use or advanced DIYers. |
For most beginners, a high-quality nail glue specifically formulated for rhinestones or using builder gel with a UV/LED lamp will provide the best balance of ease and durability.
Rhinestone Placement Strategies for Maximum Impact
Where you place your rhinestones can change the entire look of your manicure. Don’t be afraid to experiment!
- Accent Nail Focus: Dedicate one nail (like your ring finger) to a full rhinestone design. This draws attention without overwhelming the entire hand.
- French Tip Sparkle: Apply small rhinestones along the white tip of a French manicure for an elegant shimmer.
- Cuticle Bling: Place a line of tiny rhinestones along your cuticle line for a modern, chic look.
- Pattern Play: Create simple shapes like stars, hearts, or flower motifs with your rhinestones.
- Full Coverage Glam: For a truly show-stopping manicure, cover an entire nail or a significant portion of it with rhinestones. This works best with a strong gel adhesive.
Remember to consider the size of the rhinestone in relation to the nail space. Smaller stones work for intricate patterns or delicate accents, while larger ones can be statement pieces.
Maintaining Your Bling: Tips for Keeping Them Shiny
You’ve worked hard to get those rhinestones looking perfect – now let’s keep them that way! Proper care will extend the life of your dazzling nail art.
- Be Gentle: Avoid picking at your nails or using them as tools to open packages or scrape surfaces. This is the fastest way to dislodge stones.
- Moisturize (Carefully): Use cuticle oil and hand lotion daily, but try to avoid coating the rhinestones directly. Massage the oil into your cuticles and the skin around your nails.
- Avoid Harsh Chemicals: Wear gloves when cleaning or doing chores that involve prolonged contact with water or cleaning products. Chemicals can break down nail glue and dull the shine of your stones.
- Touch-Ups: If a stone does come loose, don’t despair! You can usually reapply it with a tiny dot of nail glue or clear nail polish and a careful application of top coat.
For a deeper understanding of nail health and durability, the National Center for Biotechnology Information (NCBI) offers valuable insights into the science behind nail structure and best practices for care.
Troubleshooting Common Rhinestone Issues
Even with the best intentions, sometimes things don’t go exactly as planned. Here are some common issues and how to fix them.
Problem: Rhinestones Not Sticking
Possible Causes: Oily nail surface, old or weak glue, not enough adhesive, improper drying/curing time.
Solutions: Ensure nails are thoroughly cleansed with alcohol. Use a fresh, high-quality adhesive. Apply a slightly larger dot of glue or ensure you are embedding adequately in gel. Hold stones longer or ensure proper curing.
Problem: Rhinestones Losing Sparkle (Looking Dull)
Possible Causes: Top coat applied over the top of the stones, exposure to harsh chemicals, dusty or low-quality stones.
Solutions: Apply top coat carefully around the stones, not directly over them, especially with sparkle finishes. Wear gloves for chores. Invest in good quality rhinestones.
Problem: Glue Spreading and Looking Messy
Possible Causes: Too much glue applied, glue hasn’t set before placing the stone.
Solutions: Use only a tiny bead of glue. Let the glue become slightly tacky for a moment before picking up and placing the stone (this is more applicable to some nail glues). Work one stone at a time.
Problem: Stones Falling Off Prematurely
Possible Causes: Insufficient base color strength, weak adhesive connection, rough handling.
Solutions: Ensure your base polish/gel is fully cured and strong. Consider using builder gel for a more robust hold. Minimize rough contact with the rhinestone surfaces. Reinforce with a thin layer of top coat around the edges.
FAQs: Your Rhinestone Nail Questions Answered
Q1: Can I apply rhinestones on regular nail polish?
A1: Yes! You can apply rhinestones on regular nail polish using nail glue. Make sure the polish is completely dry before applying the glue and stone. A good topcoat around the stone (not over its surface) is important for longevity.
Q2: How long do rhinestones applied with nail glue usually last?
A2: With careful application and sealing, rhinestones applied with nail glue can last anywhere from a few days to about a week. They tend to be less durable than those applied with gel or acrylic.
Q3: What’s the best way to pick up tiny rhinestones?
A3: A wax pencil or a specialized rhinestone picker tool with a sticky tip is excellent for picking up tiny stones. Fine-tipped tweezers also work very well for precision placement.
Q4: Should I put top coat on top of the rhinestones?
A4: It’s generally best to apply top coat around the rhinestones, not directly over their facets, especially if they have a special finish like AB. Applying top coat over them can dull their shine. However, for maximum protection on very small stones, a tiny amount carefully applied to the sides can help secure them.
Q5: Can rhinestones damage my natural nails?
A5: Rhinestones themselves don’t typically damage natural nails. Damage can occur from improper glue removal, using your nails as tools, or aggressive filing around the stones. Always remove nail products gently.
Q6: How do I remove rhinestones from my nails without damaging them?
A6: For nail glue, soak a cotton ball or pad in acetone-based nail polish remover, place it over the nail, and wrap with foil. Let it sit for 10-15 minutes. The glue should soften enough to gently lift the rhinestones. For gel-adhered stones, you might need to gently file away the top layer of gel before soaking in acetone.
Q7: How many rhinestones can I put on one nail?
A7: This is entirely up to your preference and design! You can opt for a single statement stone, a delicate pattern, or even full coverage. Just be mindful of the weight and potential for snagging if you cover a very large area.
Conclusion: Your Sparkliest Manicure Awaits!
See? Applying rhinestones on nails is totally achievable and so much fun! By following these simple steps, using the right tools, and choosing the best adhesive for your needs, you can create breathtaking, sparkling nail art that lasts. Don’t be afraid to experiment with different designs, colors, and placements. Your nails are a canvas for your personal style, so let them shine! Remember to prep, apply with care, and seal strategically. With a little practice, you’ll be a rhinestone application pro in no time, ready to add a dazzling touch to any outfit or occasion. Happy sparkling!


