Nail care tips before doing designs are crucial for achieving a smooth, long-lasting, and professional-looking manicure. Start with clean, prepped nails by gently buffing, shaping, and ensuring the cuticle area is tidy. This foundational work prevents lifting, allows polish to adhere better, and makes your nail art truly shine.
Ready to create some stunning nail art? We all get excited to jump right into the fun part – the designs! But before you grab your polish and dotting tools, taking a little time for essential nail care makes a world of difference. Skipping this step is like trying to paint a masterpiece on a bumpy, dirty canvas. Not ideal, right? Don’t worry; it’s simpler than you think! We’ll walk through everything you need to know to get your nails design-ready. You’ll be creating salon-worthy art in no time!
Frequently Asked Questions
Why is cuticle care important before nail art?
Tidy cuticles ensure a clean canvas for your design and prevent polish from lifting, leading to a smoother, neater finish. It also makes your polish last longer!
How often should I file my nails before applying a design?
You only need to file your nails right before you do a design for shaping. Regular filing can weaken nails. Focus on gentle shaping for the best results.
Do I need to use a base coat for nail art?
Absolutely! A base coat is non-negotiable. It protects your natural nails from staining, provides a smooth surface for polish, and helps your design adhere better.
What if my nails are peeling or bumpy? Can I still do nail art?
While you can technically apply art to imperfect nails, the result won’t be as smooth or last as long. It’s best to address peeling and bumps with good nail care first. Try a nourishing oil and give your nails some TLC before diving into designs.
How long should I wait after doing my nail care routine before applying polish?
Allow your nails to be completely dry and free of oils after your care routine. This usually means waiting about 5-10 minutes after applying cuticle oil or washing your hands.
Can I use hand sanitizer right before doing nail art?
It’s best to avoid hand sanitizer immediately before applying polish. Sanitizers contain alcohol, which can dry out your nails and cuticles, and leave a residue that might affect polish adhesion.
What’s the benefit of buffing nails before design application?
Buffing gently smooths the nail surface, removing ridges and creating a slightly porous texture. This helps polish and designs adhere much better, preventing chips and extending wear time.
Your Essential Nail Prep Checklist
Before we get lost in a rainbow of colors and intricate patterns, let’s talk about building a strong foundation. Think of it like preparing a delicious cake – you wouldn’t just throw everything into a pan! You need to mix and prepare. For amazing nail art, your nails are that perfect canvas.
Getting your nails in tip-top shape before you start designing is key to a manicure that looks professional, lasts longer, and truly lets your creativity shine. Let’s break down the must-do steps.
Step 1: Clean Slate – Wash and Dry Your Hands
This might sound super obvious, but it’s the first and most important step! Wash your hands thoroughly with soap and water. This removes any dirt, old polish residue, or oils. Make sure to dry your hands completely; damp nails can affect polish adhesion.
Step 2: Cuticle Care – Gentle is Key
Healthy cuticles frame your nails beautifully and are essential for a polished look. Overly dry or ragged cuticles can distract from your nail art.
How to Perform Gentle Cuticle Care:
- Moisturize: Apply a cuticle oil or a rich hand cream to your cuticles. Massage it in gently to soften the skin.
- Push, Don’t Cut: Instead of cutting your cuticles (which can lead to damage and infection), gently push them back using a cuticle pusher or an orangewood stick. Do this after softening them with oil.
- Remove Hangnails: If you have any annoying hangnails, gently snip them away with clean cuticle nippers. Be very careful not to cut live skin.
Dry cuticles can sometimes feel tight. Keeping them moisturized helps prevent dryness and keeps them looking neat, providing a cleaner edge for your nail art. You can find great cuticle oils that contain nourishing ingredients like vitamin E, jojoba oil, or almond oil. For more information on nail health, the American Academy of Dermatology offers great resources on maintaining healthy nails.
Step 3: Shape and File Your Nails
Now it’s time to give your nails the perfect shape. This step is crucial for both aesthetics and preventing snags that can ruin your design later.
Choosing the Right Nail File:
It’s best to use a fine-grit file, typically 180-240 grit, for shaping natural nails. Coarser grits (like those used for acrylics) can damage your natural nail.
- File in One Direction: Avoid sawing back and forth, as this can cause splitting and weakening. File gently from one side of the nail to the other in a single direction.
- Consistent Shape: Aim for a consistent shape across all your nails. Whether you prefer square, round, oval, or squoval, make them look uniform.
- Check for Snags: After filing, run a fingertip over the edge of your nail to check for any rough spots or snags. Gently file these away.
A well-shaped nail not only looks better but also provides a stable surface for your designs, reducing the risk of premature chipping or peeling.
Step 4: Buff for Smoothness
Buffing might seem like an extra step, but it plays a vital role in creating a perfectly smooth canvas for your nail art.
Why Buffing is Important:
- Smooths Ridges: Most natural nails have natural ridges. Gentle buffing helps to smooth these out, creating a more even surface for polish application.
- Removes Oils: Buffing can help remove any remaining natural oils from the nail surface. This is important because oils can prevent polish from adhering properly.
- Creates a Slight Grip: A lightly buffed surface can create a microscopic texture that helps polish and base coats grip the nail better.
Use a fine-grit buffer (typically the ‘smoothing’ or ‘fine grit’ side of a multi-sided buffer). Buff with light pressure in one direction. Don’t over-buff, as this can thin your nails over time. A quick, light pass is all you need!
Step 5: Clean Again – Remove All Dust
After filing and buffing, there will be a fine dust on your nails. This dust can interfere with polish adhesion and lead to a bumpy finish.
How to Remove Nail Dust:
- Brush It Off: Use a clean, soft nail brush to gently sweep away the dust from your nails and surrounding skin.
- Lint-Free Wipes: For a more thorough clean, lightly dampen a lint-free wipe with nail polish remover or rubbing alcohol and gently wipe down each nail. This removes dust and ensures the nail is free of any oils.
Ensure your nails are completely dry and free from any residue before moving on to the next steps.
Step 6: Apply a Base Coat – Your Design’s Best Friend
This step is non-negotiable for any nail art enthusiast! A good base coat is the unsung hero of a long-lasting, beautiful manicure.
Benefits of Using a Base Coat:
- Prevents Staining: Dark polishes, especially reds and blues, can stain your natural nails. A base coat acts as a protective barrier.
- Improves Adhesion: It creates a slightly tacky surface that polish can adhere to, helping to prevent chips and peeling.
- Smooths the Surface: It fills in minor imperfections on the nail, providing a smooth, even base for your design.
- Extends Wear Time: By creating a better bond between your nail and the polish, a base coat helps your manicure last longer.
Apply one thin, even layer of base coat to each nail. Let it dry completely (usually 30-60 seconds) before applying your colored polish.
Essential Tools for Nail Prep
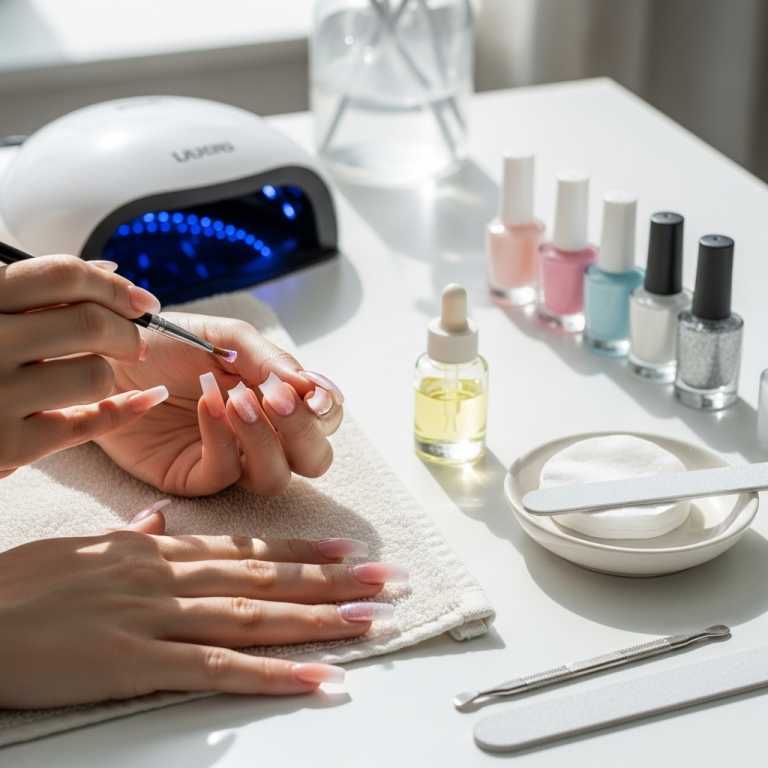
To get your nails perfectly prepped for nail art, you don’t need a million fancy tools. A few key items will make your life so much easier and ensure beautiful results.
Here’s a breakdown of the must-have items for your nail care toolkit before you dive into designing:
| Tool | Purpose | Tips for Use |
|---|---|---|
| Nail File (Fine Grit) | Shaping and refining nail edges. | Use gentle, unidirectional strokes. Avoid over-filing which can weaken nails. |
| Nail Buffer | Smoothing nail surface, removing ridges, adding shine. | Use the fine-grit or smoothing side. Buff lightly and evenly. |
| Cuticle Pusher or Orangewood Stick | Gently pushing back softened cuticles. | Use after softening cuticles with oil or cream. Be gentle. |
| Cuticle Nippers | Trimming hangnails or excess dead skin. | Use only on dead skin. Snipping live skin can cause damage and infection. |
| Soft Nail Brush | Sweeping away nail dust after filing/buffing. | Keep it clean and use gentle strokes. |
| Lint-Free Wipes | Cleaning excess dust and oils with remover. | Essential for a perfectly oil-free surface. |
| Cuticle Oil or Cream | Softening cuticles and nourishing the nail bed. | Massage into cuticles daily, especially before pushing back. |
| Nail Polish Remover | Cleaning off old polish and excess oils. | Use an acetone-free remover for less drying if preferred. |
| Base Coat | Protecting nails, improving polish adhesion, and smoothing. | Apply one thin, even coat. Let it dry completely. |
Having these items on hand will make your nail prep process efficient and effective. Remember, quality tools don’t have to break the bank; many affordable options work just as well!
Common Nail Prep Mistakes to Avoid
Even with the best intentions, it’s easy to slip up when prepping your nails. Knowing these common pitfalls will help you avoid them and ensure your nail art stays flawless!
1. Over-filing or Sawing Your Nails
Why it’s bad: Filing back and forth vigorously weakens the nail edge, leading to peeling and breakage. It can also create micro-tears in the nail plate.
The fix: Always file gently in one direction. Use a fine-grit file (180-240 grit) and take long, smooth strokes from the side towards the center of the nail.
2. Cutting Your Cuticles
Why it’s bad: Cutting cuticles can damage the nail matrix (where the nail grows from), leading to infection and irregular nail growth. It also makes them grow back faster and rougher.
The fix: Soften cuticles with oil or cream and gently push them back with a cuticle pusher or orangewood stick. Any excess dead skin can be carefully snipped with nippers, but avoid cutting into the live skin.
3. Skipping the Base Coat
Why it’s bad: This is a recipe for stained nails and polish that chips easily. Your nail art won’t have a smooth surface to adhere to, reducing its lifespan.
The fix: Never skip the base coat! It’s your nail’s protector and your design’s best friend for longevity and a flawless finish.
4. Not Removing Dust or Oils
Why it’s bad: Dust and natural nail oils create a barrier between your nail and polish. This means your polish (and your beautiful design) won’t stick properly, leading to premature lifting and chipping.
The fix: After filing and buffing, always brush off dust and then use a lint-free wipe with a tiny bit of nail polish remover or alcohol to ensure a clean, oil-free surface.
5. Using Harsh Removers Too Often
Why it’s bad: Acetone can be very drying to your nails and cuticles, making them brittle and prone to breakage. This isn’t ideal for healthy nails ready to be adorned.
The fix: Opt for acetone-free removers for regular polish if you find your nails get dry. If you use gel polish, you’ll need acetone, but always follow up with intensive cuticle oil and hand cream.
6. Rough Handling of Nails
Why it’s bad: Using your nails as tools (like opening cans!) or being rough with them during your prep can lead to chips, cracks, and breaks before you even start your design.
The fix: Be mindful of your hands and nails. Use actual tools for tasks, and be gentle during filing, buffing, and cleaning.
Nail Hydration and Health Considerations
Healthy nails are happy nails, and happy nails make for the best canvas for your art! Before you start with polish, think about the overall health and hydration of your nails and cuticles.
Cuticle Hydration is Key
Dry, flaky cuticles don’t just look unappealing; they can also lead to hangnails and make polish application uneven. Regularly massaging cuticle oil into your nail beds can:
- Soften and nourish cuticles.
- Promote healthier nail growth.
- Prevent painful hangnails.
- Give your nail bed a well-cared-for look.
Applying cuticle oil after your cleaning and shaping steps, and then letting it absorb, is a wonderful final touch before your base coat.
Strengthening and Nourishing Treatments
If your nails are prone to breaking or peeling, consider using a nail strengthener or a nourishing treatment a few days before your nail art session. However, be cautious: some strengtheners can make nails brittle if overused. It’s often best to focus on hydration and gentle care for a temporary design.
Tip: For a natural boost, look for nail polishes and treatments that contain ingredients like biotin, vitamin E, or keratin.
Avoiding Harsh Chemicals
Before applying polish, ensure your hands are free from harsh cleaning chemicals. If you’ve recently done chores, wash your hands thoroughly and apply a bit of hand cream. Wait for the cream to absorb before moving onto your nail prep, especially before applying a base coat, as oils can interfere with adhesion.
The Role of a Good Base Coat
We’ve mentioned it, but it’s worth diving a bit deeper into why the base coat is your absolute best friend when it comes to nail art. Think of it

