Create stunning galaxy nail designs with stars by layering dark blues, purples, and blacks with white and silver specks for a celestial effect. This guide breaks down the simple steps and essential tools for a beginner-friendly, cosmic manicure that will make your nails twinkle like the night sky.
Step into a universe of breathtaking beauty right at your fingertips! Dreaming of nails that shimmer with the depth of the cosmos and twinkle with distant stars? A galaxy nail design with stars is the perfect way to express your inner stargazer and add a touch of magic to any look. It might seem complex, but trust me, it’s totally achievable, even for beginners! We’ll walk through every simple step, turning your nails into miniature masterpieces that are out of this world. Get ready to unleash your creativity and craft a look that’s as unique and vibrant as the night sky itself. Let’s dive in!
—
Why You’ll Love Galaxy Nails
Galaxy nail designs capture the imagination with their mesmerizing swirls of deep colors, glittering stars, and ethereal nebulae. They offer endless creative possibilities, allowing for unique interpretations and personalization. Plus, they are surprisingly forgiving, making them an excellent choice for nail art novices. Who doesn’t want a little bit of the universe on their nails?
—
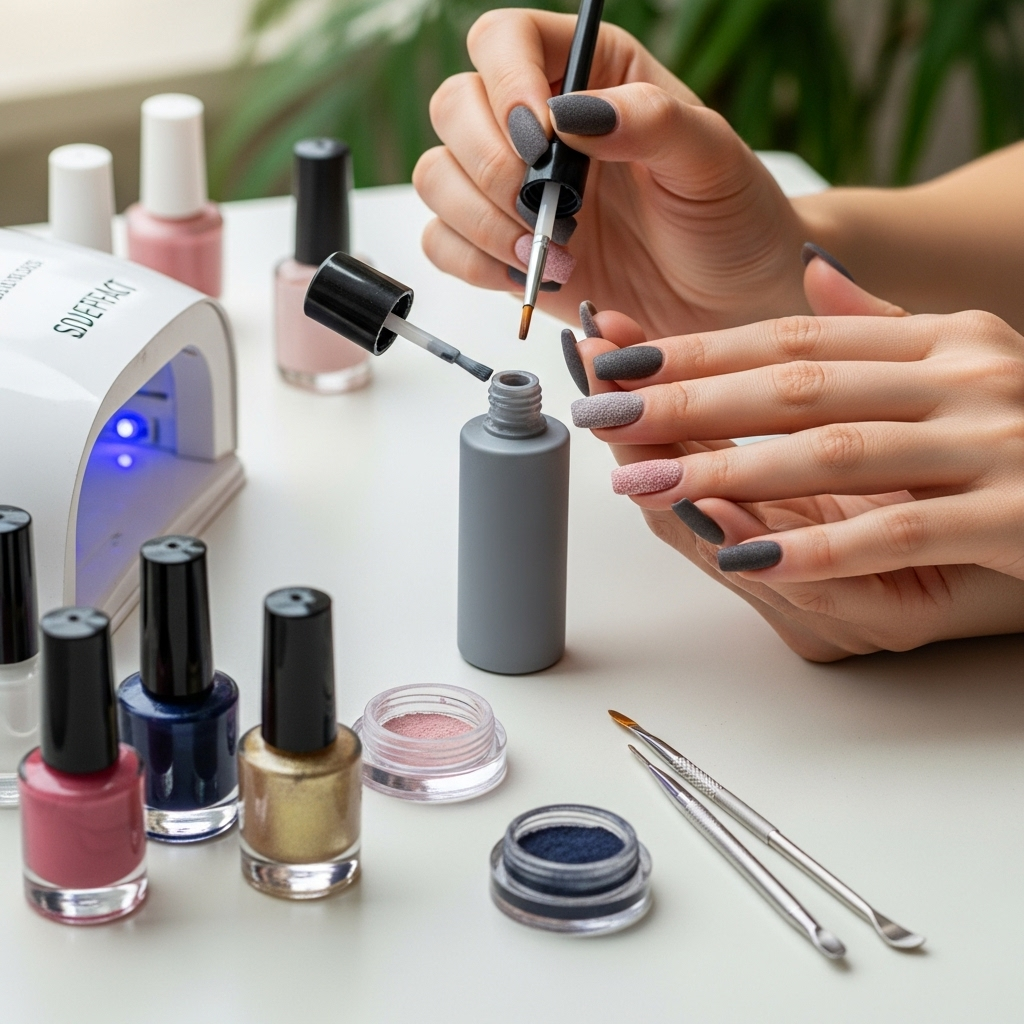
Essential Tools for Your Cosmic Creation
Gathering the right tools is the first step to a stellar manicure. You don’t need a professional kit; most of these items are readily available and budget-friendly.
Base Coat: Protects your natural nails and helps polish adhere.
Dark Nail Polishes: Think deep blues, purples, blacks, and even dark reds or greens. These form the base of your galaxy.
White and Silver/Gold Nail Polish or Paint: For creating stars and nebulae.
Sponge (Cosmetic or Kitchen): A dry makeup sponge is perfect for creating the blended, cloudy effect of a galaxy.
Fine-Tip Brush or Toothpick: For dotting and creating smaller stars.
Loose Glitter or Glitter Polish: To add that extra sparkle and dimension.
Top Coat: Seals your design and adds a glossy finish.
Clean-up Brush or Cotton Swab: For tidying up any polish mistakes.
Nail Polish Remover: For quick clean-ups.
Optional: Stamping Plates or Star Stickers: For alternative ways to add star elements.
—
Step-by-Step: Creating Your Galaxy Nail Design
This guide will break down the process into simple, manageable steps. Remember, nail art is all about having fun and experimenting, so don’t be afraid to play with colors and placement!
Step 1: Prep Your Canvas
Before any color goes on, proper nail prep is key for a long-lasting and beautiful design.
1. Shape Your Nails: File your nails to your desired shape.
2. Push Back Cuticles: Gently push back your cuticles using a cuticle pusher.
3. Cleanse: Ensure your nails are clean and dry. Remove any old polish and oils.
4. Apply Base Coat: Apply one layer of clear base coat. This helps prevent staining and gives the polish something to grip. Let it dry completely.
Step 2: Laying the Galactic Foundation
This is where the magic begins! We’ll use dark colors to create the deep space effect.
1. Apply Base Color: Paint your nails with your darkest color, usually black, deep blue, or dark purple. You might need two coats for full opacity. Let the polish dry to the touch but not completely hardened, as this helps with blending.
2. Create the Swirls:
Take your makeup sponge and gently dab a bit of your second color (e.g., deep blue over black, or purple over blue) onto a small, clean surface like a piece of paper or a palette.
Lightly press the sponge onto your nail, dabbing and moving slightly to create a soft, blended effect. Think of it as painting clouds in the night sky.
Repeat with other galaxy colors (e.g., purple, dark teal) by dabbing them onto the sponge or directly onto the nail and blending with your initial color. The key is to build layers and create depth. Don’t overdo it – a little goes a long way!
The goal is to have soft transitions between colors, mimicking nebulae. Avoid harsh lines.
Step 3: Adding Stars and Sparkles
Now for the twinkling stars and celestial dust!
1. For Star Dots:
Dip your fine-tip brush or the tip of a toothpick into white or silver nail polish.
Gently dot small specks onto your nails. Vary the size of the dots for a more realistic look. Some can be tiny pinpricks, while others can be slightly larger.
You can also use a stiffer brush (like a fan brush) or an old toothbrush and gently flick white paint onto your nails for a “splatter” effect, creating many tiny stars at once. For this, thin your white polish slightly with a drop of nail polish remover or thinner. Protect your skin and surrounding area before flicking!
2. For Glittery Stars and Nebulae:
Apply a thin layer of top coat or a sheer glitter polish over areas where you want extra shimmer.
While the top coat is still wet, delicately sprinkle fine silver or holographic glitter onto your nails. You can focus this on specific areas to create bright star clusters or a glowing nebula effect.
Alternatively, use a glitter polish in silver, gold, or iridescent shades and dab it strategically with your sponge or brush.
Step 4: Adding Moons (Optional but Recommended!)
For a perfect “galaxy nail design with stars and moons,” adding a crescent moon can elevate the design.
1. Moon Shape:
Use the tip of a fine brush or a small dotting tool.
Dip it into white or silver polish.
Carefully create a small crescent shape on one part of your nail.
You can also use a small circle of tape as a stencil for a cleaner shape, though this can be tricky on nails.
Step 5: Clean Up and Seal
The final touches make a huge difference.
1. Clean Edges:
Dip a clean-up brush or cotton swab into nail polish remover.
Carefully go around the cuticles and side walls of your nails to remove any excess polish for a neat finish. This is where a brush designed for nail art cleanup is a lifesaver!
2. Apply Top Coat:
Once everything is completely dry, apply a generous layer of a good quality top coat. This will seal in all your hard work, add incredible shine, and make your galaxy design last.
If you used loose glitter, ensure your top coat is thick enough to fully encapsulate it, preventing rough edges.
—
Pro Tips for Out-of-This-World Results
Even beginners can achieve pro-level results with these simple tips:
Patience is Key: Let each layer dry to the touch before applying the next. This prevents smudging and ensures smooth blending.
Less is More: Don’t overload your sponge or brush with polish. It’s easier to add more than to remove too much.
Color Combinations: Don’t be afraid to experiment! Beyond blues and purples, consider adding hints of magenta, teal, or even a touch of deep red for a richer, more complex galaxy.
Glitter Placement: Think about where the light would hit in space. Glitter can highlight brighter areas of your nebulae or create the illusion of distant stars.
Matte Finish: If you prefer a matte look, apply a matte top coat instead of a glossy one. It can give your galaxy a velvety, cosmic feel.
Practice Sponge Technique: Dabbing lightly is better than heavy pressing. Build color gradually.
Artist-Grade Polish: For more intense colors or better blending, consider acrylic paints specifically designed for nail art. These dry quickly and can offer vibrant, opaque finishes. You can find great options from brands like Mia Secret or Young Nails.
—
Galaxy Nail Design Variations
Once you’ve mastered the basic technique, why not explore some fun variations?
Nebula Focus: Instead of a full galaxy, create a single nebula effect on an accent nail, surrounded by a solid dark color.
Constellation Nails: After creating your galaxy base, use a fine brush and white polish to paint specific constellations. You can use star stickers for this too.
Ombre Galaxy: Blend your dark galaxy colors into an ombre effect, with lighter shades towards the tips or cuticle.
Subtle Shimmer: Use sheer polishes and subtle holographic glitters for a more understated, ethereal galaxy look.
Dual-Tone Galaxy: Try a galaxy design with two contrasting main colors, like black and a vibrant pink or electric blue.
—
Maintaining Your Galactic Manicure
To keep your celestial nails looking stunning, follow these simple care tips:
Wear Gloves: Always wear gloves when doing household chores, especially washing dishes or cleaning. This protects your polish from harsh chemicals and water.
Moisturize: Keep your hands and cuticles hydrated by using cuticle oil and hand lotion daily. Healthy cuticles make any nail design look more polished.
* Touch-Ups: If you notice any chips or wear, you can often touch them up with a bit of top coat or carefully reapply a small detail.
—
Understanding Nail Polish Ingredients
For health-conscious beauty lovers, understanding what’s in your nail polish is important. Many polishes are formulated with a “3-free,” “5-free,” or “10-free” system, meaning they exclude certain potentially harmful chemicals. For example, “3-free” polishes traditionally exclude formaldehyde, toluene, and DBP (dibutyl phthalate). Many brands now offer “10-free” or even “16-free” formulations, which avoid a longer list of undesirable ingredients, promoting a safer beauty experience. Reputable sources like the U.S. Food & Drug Administration (FDA) provide consumer information on cosmetic ingredients. Always check the ingredient list if you have concerns.
—
Troubleshooting Common Galaxy Nail Issues
It’s normal to encounter a few hiccups when trying a new nail art technique. Here’s how to fix them:
| Problem | Solution |
| :—————————————- | :——————————————————————————————————————————————————————————————————————————————————————————————————————————— |
| Muddy Blending | If your colors are blending into a muddy mess, you’re probably using too much product or blending for too long. Try dabbing lighter and faster. Also, ensure your base and secondary colors are distinct enough. Let layers dry slightly between dabs. Consider cleaning your sponge if it becomes saturated. |
| Uneven Star Distribution | For scattered stars, use a toothpick or fine brush and touch the polish to the nail. For splattered stars, use a fan brush or toothbrush. For evenness, aim for a mix of dot sizes and vary the density across the nail. Don’t be afraid of empty spaces; they add to the realism of a vast universe. |
| Chipped or Peeling Polish | This is often due to poor nail prep or a lack of a good top coat. Make sure your nails are clean, dry, and free of oils before starting. Always use a base coat and a robust top coat. Cap the free edge of your nail with top coat to seal it. |
| Smudged Design | Smudging usually happens when you try to apply the top coat too soon or too aggressively. Let your layered colors and star details fully dry to the touch. Apply top coat in smooth, even strokes without going over an area multiple times if possible. A thicker top coat can help “float” over details without disturbing them. |
| Too Much Glitter | If you’ve gone a bit overboard with glitter, don’t worry! Apply another layer of opaque dark polish using your sponge technique, focusing on areas where you want less glitter showing through. Then, carefully apply a final top coat. |
| Polish Staining Natural Nails | This is more common with dark, highly pigmented polishes. Always use a good quality base coat. If staining occurs on your skin, use a clean-up brush dipped in polish remover. For persistent nail stains, you can try a nail whitening treatment or a baking soda paste. |
—
Frequently Asked Questions (FAQ)
Q1: Do I need special nail polish for galaxy nails?
A1: Not necessarily! Standard nail polishes in dark shades (blue, purple, black) work well. You’ll also need white or silver for stars. Specialty glitter polishes can add extra sparkle, and acrylic paints can be used for finer details, but they aren’t strictly required for a beautiful outcome.
Q2: How do I get the swirly, blended effect?
A2: The most common and beginner-friendly method is using a makeup sponge. Lightly dab dark colors onto the sponge, then dab onto your nail. Blend by gently dabbing colors next to each other, layering them gradually. The key is not to over-blend, aiming for soft transitions.
Q3: My stars look like blobs. How can I make them sharper?
A3: For smaller, sharper stars, use a very fine-tip nail art brush or a toothpick. Dip just the very tip of the tool into the polish and gently dot it onto the nail. For a splattered star effect, thin your white polish slightly and flick it off a brush for countless tiny specks that resemble distant stars.
Q4: Can I use stickers or press-ons for stars if I’m a total beginner?
A4: Absolutely! Star stickers or even pre-made press-on galaxy nails are fantastic options for beginners. For stickers, apply them over a dry base coat and then seal everything with a good top coat to ensure they stay in place and don’t lift.
Q5: How long does a galaxy nail design typically last?
A5: With proper nail preparation, a good base and top coat, and careful application, a galaxy nail design can last anywhere from 5 to 10 days. Using gloves for chores and moisturizing your hands regularly will help extend its life.
Q6: Which colors are best for a realistic galaxy look?
A6: The most classic galaxy colors include deep blues, vibrant purples, and black. You can also incorporate hints of dark teal, magenta, or even deep red for added depth. White or silver is essential for creating stars and nebulae effects.
Q7: Is it hard to do galaxy nails without getting polish on my skin?
A7: It can be a bit messy at first, but it’s manageable! Using a clean-up brush (a small, flat brush) dipped in nail polish remover is the best way to clean up any polish that gets on your skin around the nail. Applying a liquid latex or barrier around your nails before painting can also help prevent polish from sticking to your skin.
—
Conclusion
And there you have it – your very own guide to creating mesmerizing galaxy nail designs with stars! From selecting your cosmic color palette to crafting those dazzling star specks, we’ve covered every step to help you achieve a stunning, out-of-this-world manicure. Remember, nail art is all about personal expression. Don’t be afraid to tweak the colors, add your own flair with different glitters, or experiment with constellation patterns. With a little practice and these easy-to-follow tips, you’ll be creating breathtaking celestial nails that are sure to turn heads. So grab your polishes, unleash your inner artist, and let your nails shine like the universe itself. Happy polishing!