Unicorn pastel nail design is a whimsical and magical way to add a touch of fantasy to your fingertips. This guide breaks down the steps for creating stunning, dreamy unicorn-inspired manicures using soft pastel hues, perfect for beginners. Learn the essential tools, techniques, and tips for achieving professional-looking results at home.
Dreaming of nails that look like they’ve stepped right out of a fairy tale? Unicorn pastel nail designs are the enchanting trend you’ve been waiting for! These designs capture the ethereal beauty of unicorns with soft, blended pastel colors, often incorporating shimmer and a touch of sparkle. If you’ve admired these magical manicures but thought they were too complicated to try yourself, think again! We’re here to show you that with a few simple steps and the right approach, you can create your own dazzling unicorn nails. Get ready to unleash your inner artist and give your nails a whimsical makeover!
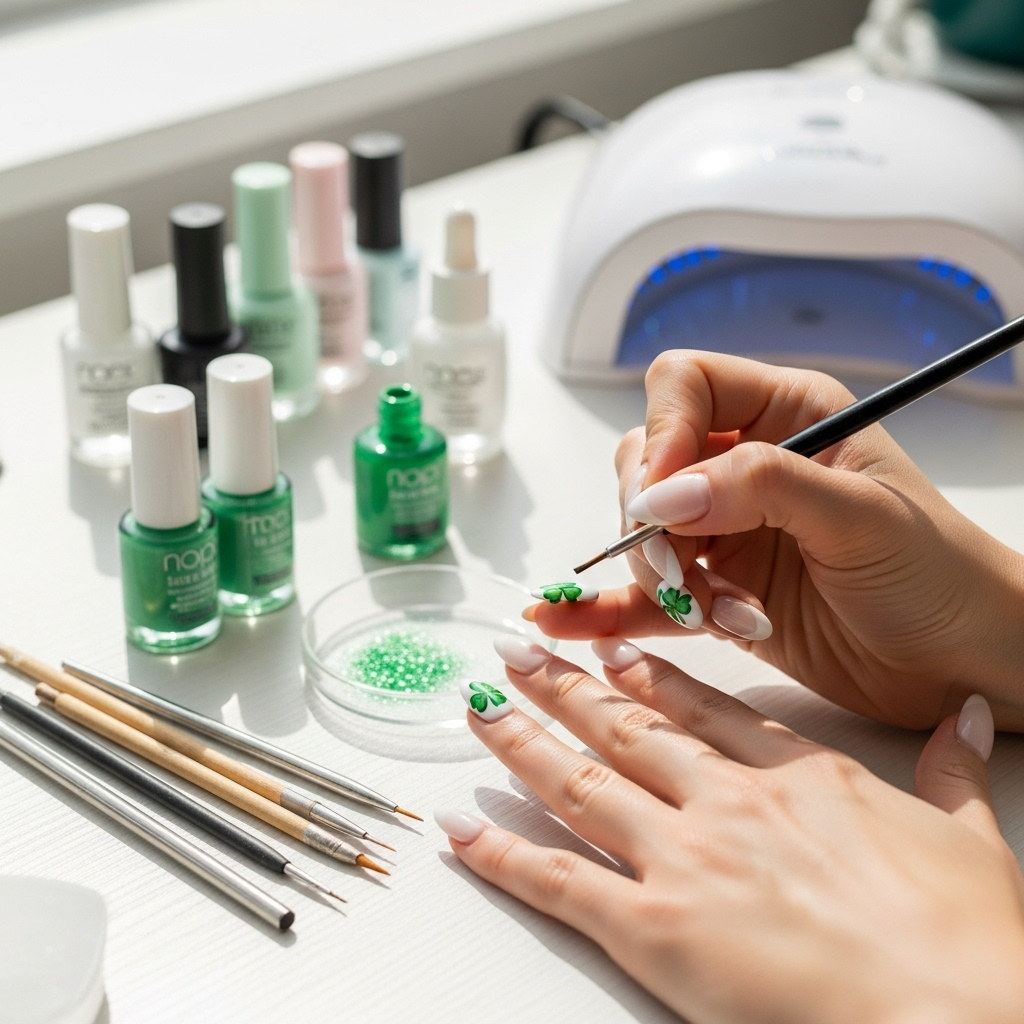
Your Essential Unicorn Pastel Nail Design Toolkit
Before we dive into the magic, let’s gather our supplies. Having the right tools makes creating your unicorn pastel nail design so much easier and the results so much more professional. Don’t worry if you don’t have salon-grade equipment; accessible, everyday items can work beautifully!
Base and Top Coats: The Unsung Heroes
Every great nail design starts with a solid foundation. These aren’t just optional steps; they are essential for a long-lasting, chip-free manicure.
- Base Coat: This is your nail’s best friend. It protects your natural nail from staining (especially important with vibrant colors!) and provides a smooth surface for your polish to adhere to. It also helps prevent chips and extends the life of your manicure.
- Top Coat: The final seal! A good top coat adds incredible shine, locks in your design, and gives your nails that salon-quality glossy finish. Look for a quick-drying formula to save time.
The Pastel Palette: Your Color Story
The heart of any unicorn pastel nail design lies in its color selection. Think soft, dreamy, and blended.
- Core Pastels: You’ll want a selection of soft shades. Think baby pink, sky blue, mint green, lavender, and soft yellow.
- White or Light Grey: This is crucial for the blended watercolor effect, helping to lighten and diffuse the other colors.
- Iridescent or Holographic Polish/Flakes: This is what truly brings the unicorn magic to life! A sheer iridescent polish or scattered holographic flakes will give you that signature unicorn sheen.
Application Tools: For Precision and Blend
These tools help you achieve the characteristic smooth gradients and delicate details of unicorn nails.
- Nail Art Brush (Fine-tipped): For any small details, lines, or touch-ups.
- Sponge (Cosmetic or Nail Art Specific): A regular makeup sponge (like a beauty blender) or a specialized nail art sponge is perfect for creating gradient effects. Cut a small piece to make it manageable for nail application.
- Dotting Tool: Great for adding small dots, accents, or even tiny stars.
- Palette or Flat Surface: A clean tile, a piece of foil, or a disposable palette is needed to mix and marble your colors before applying them.
Essential Extras
Don’t forget these helpful items for a clean and polished finish.
- Nail Polish Remover: For cleaning up mistakes.
- Cotton Swabs or Q-tips: For precise cleanup around the cuticles.
- Nail File and Buffer: To shape and smooth your nails before you start.
- Cuticle Oil: To hydrate and nourish your nails and cuticles after the manicure.
Step-by-Step: Crafting Your Dreamy Unicorn Pastel Nail Design
Ready to create some magic? Follow these straightforward steps to bring your unicorn pastel nail design to life. We’ll focus on the popular gradient or “watercolor blend” effect, which is surprisingly simple and incredibly beautiful.
Step 1: Prep Your Canvas
A flawless design starts with perfectly prepped nails. This step ensures longevity and a smooth finish. For more on nail prep, check out Mayo Clinic’s comprehensive guide to nail care, which highlights the importance of keeping cuticles healthy and nails in good condition.
- Cleanse: Make sure your nails are clean and free of any old polish or oils.
- Shape: File your nails to your desired shape.
- Buff: Gently buff the surface of your nails to create an even texture. This helps the polish adhere better.
- Base Coat: Apply one thin layer of your base coat and let it dry completely.
Step 2: Create the Pastel Gradient
This is where the magic begins! We’ll use a sponging technique to blend those beautiful pastel colors.
- Apply White Base: Paint your nails with one or two coats of white or a very light grey polish and let it dry completely. This light background will make your pastel colors pop.
- Prepare Your Sponge: Cut a small piece from your makeup sponge. You want it to be easy to handle for dabbing on your nail.
- Marble the Colors: On your palette or foil, place a few dots of your chosen pastel polishes (e.g., pink, blue, purple) and a dab of white. Use a toothpick or the tip of your brush to gently swirl them together. Don’t overmix; you want distinct streaks of color.
- Apply to Nail: Lightly dab the sponge onto the swirled colors on your palette, picking up a bit of each shade. Then, gently dab the sponge onto your nail.
- Layer and Blend: Repeat the process, dabbing the sponge onto the palette and then onto your nail. Overlap your dabbing slightly to blend the colors seamlessly. You are essentially stippling the color onto your nail. You can go back and pick up more colors from the palette as needed.
- Build Intensity: Continue dabbing until you achieve the desired color intensity and blend. Be patient, and don’t press too hard, as this can create harsh lines.
- Clean Up: Immediately after sponging, use a cotton swab dipped in nail polish remover to clean up any polish that got on your skin or cuticles.
- Let it Dry: Allow your gradient layer to dry completely. This is important before moving to the next step.
Step 3: Add the Unicorn Shimmer
This is the sparkly, ethereal layer that truly makes it a unicorn design!
- Option A: Iridescent Top Coat: Apply a sheer, iridescent or holographic top coat over your dried gradient. One coat usually does the trick to impart a beautiful, shifting sheen.
- Option B: Loose Flakes: While the iridescent top coat is still slightly wet, use a dry brush or your fingertip to gently press loose holographic or iridescent flakes onto your nails. Build them up for a scattered, magical effect. You can then go over any loose flakes with another thin layer of clear top coat to secure them.
Step 4: Seal and Shine
The final touch that locks everything in place and makes your nails look professionally done.
- Apply Top Coat: Apply a generous layer of your favorite high-shine top coat over the entire nail, making sure to cap the free edge (paint a little bit on the very tip of your nail). This is crucial for preventing chips.
- Let it Dry: Allow your top coat to dry completely. A quick-dry top coat is your best friend here!
Step 5: Finishing Touches
A little pampering goes a long way!
- Apply Cuticle Oil: Once your top coat is fully dry, apply a few drops of cuticle oil around each nail and gently massage it in. This rehydrates your cuticles and makes the whole manicure look complete and polished.
Exploring Different Unicorn Pastel Nail Variations
The “unicorn pastel nail design” is a wonderfully versatile concept. Once you’ve mastered the basic gradient, you can experiment with many different looks. Here are a few ideas to spark your creativity:
The Ombre Unicorn
Instead of multiple colors blended horizontally, an ombre unicorn design focuses on a smooth transition of one or two pastel shades fading into each other, often from cuticle to tip, or side to side. The iridescent finish is key here to give it that mythical feel.
Unicorn Horn Accent Nail
This is a fun and effective way to incorporate the unicorn theme without going full rainbow on every nail. Paint a few nails in soft pastel colors, perhaps with a simple shimmer. Then, on one accent nail, use a fine-tip brush and perhaps white or metallic polish to paint a stylized unicorn horn, often with a delicate swirl. You can add a touch of gold or silver for extra flair.
Unicorn Marble Magic
Similar to the gradient, but with more distinct swirls and patterns. Instead of stippling a blended color onto the nail, you’ll create more defined marble patterns using your palette and a toothpick or needle. This gives a more abstract, yet still mystical, look.
Stellar Unicorn with Stars and Moons
Combine your pastel gradient with tiny star or moon decals, or use a dotting tool and a metallic polish to paint them on. This adds an extra layer of cosmic enchantment to your unicorn pastel nail design. A fine-tipped brush with silver or gold polish can create delicate constellations.
Matte Unicorn Dream
While shine is traditional, a matte finish can give your unicorn pastel nail design a sophisticated, velvety texture. Simply use a matte top coat instead of a glossy one in the final step. The pastel colors will appear softer, almost like powdered candy, and the shimmer will be more subtle, yet still magical.
Tips for Nail Longevity and Maintenance
You’ve created a beautiful unicorn pastel nail design, and you want it to last! Here are some tips to keep your nails looking magical for as long as possible.
- Avoid Harsh Chemicals: Wear gloves when doing household chores, especially anything involving dish soap or cleaning products. These can strip the polish and cause chipping.
- Be Gentle: Try not to use your nails as tools to open cans or scrape things. This is a quick way to chip or break them.
- Reapply Top Coat: If you notice your manicure losing its shine after a few days, you can apply an extra layer of top coat to refresh it. This also adds an extra layer of protection.
- Keep Cuticles Hydrated: Regularly applying cuticle oil will keep your nails and the skin around them healthy and moisturized, preventing dryness and breakage.
- Touch-Ups: If you get a small chip, don’t despair! You can often fix it by carefully applying a bit of polish and another layer of top coat to the affected area.
Proper care ensures that your beautiful unicorn pastel nail design remains pristine!
Troubleshooting Common Unicorn Pastel Nail Design Issues
Even with the best intentions, sometimes we hit a little snag. Here are some common problems and how to fix them.
Problem: Streaky or Uneven Gradient
Solution: This often happens if you don’t pick up enough color on the sponge or if the nail polish is too thick. Try stippling more gently and ensuring you have a good mix of colors on the sponge. If the colors are too opaque and not blending well, try adding a dot of white polish to your marble mix. Also, ensure your base white layer is fully dry.
Problem: Colors Are Muddy or Blended Too Much
Solution: You might be over-mixing the colors on your palette, or dabbing the sponge too aggressively. Try swirling the colors on the palette more lightly and stippling onto the nail with a lighter touch. Also, if your sponge has too much polish on it, it can blend colors too much. Wipe off excess polish from the sponge onto a piece of paper before dabbing your nail.
Problem: Polish Isn’t Sticking to the Nail (Peeling/Chipping Quickly)
Solution: This is usually a prep issue. Ensure your nails were thoroughly cleaned and free of oils before you started. Make sure you used a good base coat and let it dry completely. Crucially, always cap the free edge of your nail with your base, color, and top coats. This seals the edge and significantly improves longevity.
Problem: Sponging is Too Rough, Looks Textured
Solution: Use a softer sponge, or cut a smaller, finer-celled piece. Don’t press too hard when dabbing. A lighter, more tapping motion is best for a smooth gradient. If it’s already applied, a thicker, good-quality top coat can help smooth out minor texture if it is not too severe. You can also gently buff the surface of the dried colors very lightly with a fine buffer before applying the iridescent coat and top coat.
Problem: Iridescent/Holographic Finish Isn’t Strong Enough
Solution: Apply a second thin coat of your iridescent polish. If using flakes, try a slightly denser application. Ensure your underlying colors are opaque enough for the shimmer to stand out; sometimes a sheer base can mute the effect.
Problem: Cleanup is Messy
Solution: Use a precise tool like a small, fine-tipped brush or an orange wood stick wrapped with a small amount of cotton. Dip it in nail polish remover and carefully trace around your cuticle line. Clean the brush or stick frequently. You can also apply a layer of latex nail tape or carefully paint with white glue around your cuticles before you start sponging; peel it off once you’ve cleaned up the excess polish.
Frequently Asked Questions About Unicorn Pastel Nail Designs
Here are some common questions beginner nail art enthusiasts have about creating unicorn pastel nail designs.
Q1: What kind of polish is best for the pastel colors?
A1: Creamy, opaque pastel polishes work best for creating a vibrant gradient. Gel polish can also be used for this effect and offers longer wear. However, regular nail polish is perfectly fine and easier for beginners!
Q2: Do I need a special sponge for nail art?
A2: Not necessarily! A clean piece of a regular makeup sponge (like a beauty blender) works wonderfully. You can also find small, specialized nail art sponges online or in beauty stores that are designed for this purpose.
Q3: How do I get the colors to blend smoothly?
A3: The key is gentle dabbing with the sponge and not over-mixing the colors on your palette. Think of “stippling” the color onto the nail rather than painting. Apply in light layers, allowing each to build up the color and blend naturally.
Q4: Can I do this with regular nail polish, or do I need gel?
A4: You absolutely can do this with regular nail polish! While gel polish offers more durability, regular polish is much more beginner-friendly and readily available. The sponging technique works well with both.
Q5: How long does a unicorn pastel nail design typically last?
A5: With a good base and top coat, and proper care, a regular nail polish unicorn design can last anywhere from 5-7 days before significant chipping occurs. Gel polish can last much longer, typically 2-3 weeks.
Q6: What if my nails are short? Can I still do a unicorn design?
A6: Yes! Unicorn pastel nail designs are very adaptable to nail length. You might need to adjust the size of your sponge piece and be careful with the number of colors you use on very short nails to avoid looking cluttered. A simple two-color blend or a shimmer top coat can look stunning on short nails.
Q7: How do I achieve the “unicorn effect” or shimmer?
A7: The unicorn effect comes from holographic or iridescent polishes. You can achieve this by applying a sheer holographic top coat over your dried pastel gradient, or by gently pressing loose holographic flakes onto a slightly wet top coat before sealing it all in.
Conclusion: Wearable Magic at Your Fingertips
And there you have it! Your genius guide to creating breathtaking unicorn pastel nail designs at home. We’ve covered the essential tools, walked through each step from prep to sparkle, explored creative variations, and even tackled common troubleshooting. Remember, nail art is all about self-expression and having fun. Don’t be afraid to experiment with different color combinations, add your own unique touches, or adjust the techniques to suit your style and skill level. The beauty of this design is its inherent softness and dreamy quality, meaning perfection isn’t the goal – whimsical charm is. So grab your pastels, find your favorite sponge, and let your creativity flow. Go ahead, adorn your fingertips with a little bit of wearable magic and embrace your inner mythical creature!