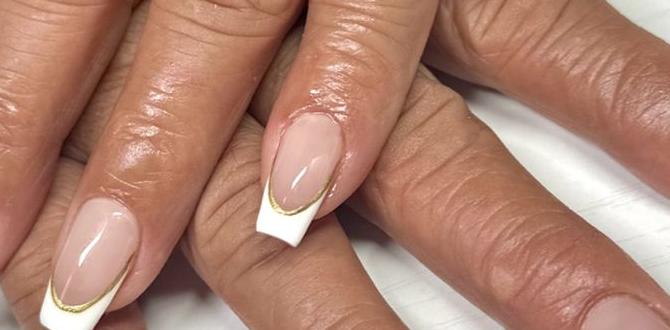
Jade nail designs are a stunning way to embrace natural beauty on your fingertips. These 6 essential looks offer simple, elegant, and achievable styles for any occasion. Whether you’re a beginner or a nail art pro, discover how to recreate these serene and sophisticated jade-inspired manicures with ease.
Thinking about a fresh nail look that’s both chic and calming? Jade nail designs are a fantastic choice! Often associated with good luck and tranquility, this beautiful gemstone inspires a palette of soothing greens, creamy whites, and touches of gold or silver. But how do you get that gorgeous jade effect without needing to be an expert artist? It’s easier than you think! Many nail lovers feel a bit overwhelmed by intricate designs, worrying they don’t have the steady hand or the right tools. That’s where we come in! We’re breaking down 6 essential jade nail designs that are surprisingly simple to achieve at home. Get ready to unlock your inner nail artist and enjoy these step-by-step guides to your most beautiful, serene nails yet!
Unlock the Elegance of Jade Nail Designs: 6 Essential Looks for Every Style
Jade nails are more than just a color trend; they’re a statement of understated elegance and natural beauty. The soft greens, coupled with marble effects and minimalist accents, create a look that’s both sophisticated and calming. Perfect for those who love a touch of luxury without being overly flashy, jade-inspired manicures are incredibly versatile. They can be adapted for daily wear, special events, or even just to bring a little zen into your everyday routine. Let’s dive into 6 essential jade nail designs that are perfect for beginners and seasoned nail enthusiasts alike.
Understanding the Jade Aesthetic
Before we jump into the designs, what exactly gives a nail design that “jade” feel? It’s primarily about the color palette and the texture. Think soft, muted greens—ranging from a pale mint to a deep emerald, often with milky or translucent undertones. The most coveted jade effect often mimics the natural inclusions and variations found in the gemstone, creating a beautiful marbling or swirling pattern. Metallic accents, like gold or silver, are frequently incorporated to add a touch of luxury and mimic the natural sheen often seen in polished jade.
Essential Tools for Your Jade Nail Journey
You don’t need a nail salon at home to create stunning jade designs! Here are some key tools that will help you achieve these looks with confidence:
- Base Coat: Crucial for protecting your natural nails and helping polish adhere.
- Top Coat: Seals your design, adds shine, and prolongs the life of your manicure.
- Nail Polish in Jade Tones: Creamy greens, milky whites, and creamsicle oranges (for accent).
- Dotting Tools or Toothpicks: For creating small dots and simple patterns.
- Thin Nail Art Brush: Ideal for fine lines and delicate swirls.
- Sponge (Cosmetic or Nail Art): For creating marble and gradient effects.
- Gold or Silver Nail Art Pens/Stickers: For adding metallic accents.
- Rubbing Alcohol or Nail Polish Remover: For cleaning up mistakes and creating some marbling effects.
- Tweezers: For accurately placing nail art stickers.
- Clean-Up Brush: A small flat brush dipped in remover to neaten edges.
Having these basic tools will make your DIY nail art journey much smoother and more enjoyable.
Design 1: The Milky Jade Marble
This is the quintessential jade look, capturing the luminous, swirling beauty of the gemstone. It’s surprisingly simple to do and always looks incredibly chic.
What You’ll Need:
- Sheer milky white nail polish
- Light jade green nail polish
- White nail polish
- A cosmetic sponge
- Base coat and top coat
- Tweezers
Step-by-Step Tutorial:
- Prep Your Nails: Start with clean, dry nails. Apply a base coat and let it dry completely.
- Apply the Base Color: Paint your nails with the sheer milky white polish. Apply two coats for an opaque, creamy effect. Let dry.
- Create the Jade Swirls: This is where the magic happens! Tear a small piece from your cosmetic sponge. On a piece of foil or a palette, dab small amounts of the light jade green polish and the pure white polish next to each other. Don’t blend them too much, just have them touch.
- Dab and Swirl: Lightly dab the sponge into the two colors, picking up a mix of green and white. Then, gently dab this onto your nails. The goal is to create soft, swirling patterns that mimic natural stone. Don’t press too hard, or you’ll muddy the colors.
- Build the Effect: Repeat the dabbing process, picking up fresh color on the sponge as needed. You can layer the dabs to build depth. Dab a little bit of the jade greenpolish directly onto the nail and gently drag it with a toothpick or the tip of your polish brush to create more defined swirls if desired.
- Refine and Seal: Once you are happy with the marble effect, let it dry for a few minutes. Clean up any polish on your skin with a clean-up brush dipped in rubbing alcohol or nail polish remover. Finish with a generous coat of top coat to seal the design and add a beautiful shine.
This marble effect is endlessly customizable. You can add a touch of metallic gold leaf or a few tiny gold foil flakes by carefully pressing them onto the wet top coat before it fully dries for an extra touch of luxury.
Design 2: The Serene Sage and Gold Accent
For a more minimalist approach, this design pairs a beautiful sage green with simple, elegant gold accents. It’s understated, sophisticated, and perfect for everyday wear.
What You’ll Need:
- Sage green nail polish
- Gold metallic nail polish or gold nail art pen
- Base coat and top coat
- Thin nail art brush (optional, if using separate gold polish)
Step-by-Step Tutorial:
- Prep and Base: Apply your base coat and let it dry.
- Apply Sage Green: Paint all your nails with the sage green polish. Apply two coats for a smooth, opaque finish. Let the polish dry completely.
- Add the Gold Accent: Choose one or two nails (like your ring fingers) to add the gold accent to.
- Option A (Gold Polish): Using a very fine nail art brush, dip into the gold metallic polish. Create a thin, delicate line along the free edge of your nail (a French tip style) or a simple curve along the cuticle. You can also create tiny gold dots or a single sweeping line.
- Option B (Gold Pen): If you have a gold nail art pen, this is incredibly easy! Simply draw your desired pattern – a thin line, tiny dots, or a small geometric shape.
- Seal Your Design: Once the gold accents are dry, apply a protective top coat over all your nails. This will seal the design and give it a beautiful, glossy finish.
This design is all about subtlety. The key is to keep the gold accents small and precise. You can experiment with placing the gold line either at the tip, at the base of the nail, or as a diagonal accent across the nail.
Design 3: The Translucent Jade Shimmer
This look captures the light and delicate translucency often found in fine jade pieces. It uses sheer polishes to create a luminous, ethereal effect.
What You’ll Need:
- Sheer jade green polish
- Translucent white or milky pink polish
- Fine glitter polish with a green or gold shimmer (optional)
- Base coat and top coat
- Small dotting tool or toothpick
Step-by-Step Tutorial:
- Prep and Base: Apply a base coat and let it dry.
- First Translucent Layer: Apply one thin coat of the sheer jade green polish. Let it dry. This creates a subtle wash of color.
- Add Depth with White/Pink: Apply one thin coat of the translucent white or milky pink polish over the jade green. This helps create that swirled, cloudy effect, like light passing through the stone. You can dab this on in slightly uneven patches for a more natural look.
- Optional Shimmer: If you have a fine green or gold shimmer polish, apply a very thin layer over the top for a subtle sparkle that catches the light beautifully.
- Enhance with Dots (Optional): For added dimension, use a tiny dotting tool to place a few small, sparse dots of the jade green polish onto the nail. Then, gently drag them with the tip of a cuticle pusher or toothpick to create subtle inclusions.
- Seal and Shine: Apply a good quality top coat to seal all the layers and achieve a smooth, glossy finish.
This design looks fantastic on shorter, natural nails as well as longer ones. The key is to keep the layers thin and let them show through each other.
Design 4: The Emerald & White Geometric
Mixing geometric patterns with the rich color of emerald creates a modern and bold jade-inspired look. This design plays with clean lines against a softer, gemstone-like background.
What You’ll Need:
- Deep emerald green nail polish
- Opaque white nail polish
- Nail art striping tape or a fine line brush
- Base coat and top coat
Step-by-Step Tutorial:
- Prep and Base: Apply base coat and let dry.
- Apply Base Color: Paint your nails with the opaque white polish. Let it dry completely. This provides a clean canvas.
- Create Geometric Lines:
- With Striping Tape: Once the white is dry, carefully apply strips of nail art tape to create your desired geometric pattern (e.g., triangles, squares, diagonal lines). Ensure the tape is pressed down firmly to prevent polish bleeding.
- With a Fine Brush: Alternatively, use a fine nail art brush dipped in emerald green polish to freehand geometric lines.
- Paint Over Taped Areas: Carefully paint over the taped sections (or your freehanded lines) with the emerald green polish. Ensure you get good coverage.
- Remove Tape/Clean Lines: While the green polish is still slightly wet (but no longer runny), carefully and slowly peel off the striping tape using tweezers or your fingers. If you used a brush, allow the green to dry slightly before using a clean-up brush with remover to sharpen any wobbly lines.
- Seal the Deal: Once the emerald green is completely dry, apply a generous layer of top coat to seal everything and add a high-gloss finish.
This design offers a striking contrast. You can also reverse it by starting with an emerald green base and adding white geometric lines.
Design 5: The Soft Jade French Tip
A gentle twist on the classic French manicure, this design uses a soft jade green for the tip instead of white. It’s elegant, understated, and perfect for a subtle pop of color.
What You’ll Need:
- Sheer nude or milky pink base polish
- Soft jade green nail polish
- French tip guide stickers (optional) or a fine brush
- Base coat and top coat
Step-by-Step Tutorial:
- Prep and Base Coat: Apply your base coat.
- Apply Nude/Pink Base: Paint your nails with the sheer nude or milky pink polish. Apply one or two coats for a natural, polished look. Let dry completely.
- Create the Jade Tips:
- With Guide Stickers: Apply French tip guide stickers to your nails, just below where you want the tip to start. Carefully paint the space above the sticker with the soft jade green polish. Once dry, gently peel off the stickers.
- Freehand with a Fine Brush: Using a fine nail art brush dipped in the jade green polish, carefully paint a curved line across the tip of each nail. Start from one side, curve up and over, and meet the other side. You can practice on paper first!
- Refine and Seal: Clean up any smudges with a clean-up brush. Once you’re happy with the tips, apply a top coat over all your nails to seal the design and add shine.
The beauty of this design lies in its subtlety. The soft jade green offers a refreshing change from the traditional white French tip while maintaining a sophisticated aura.
Design 6: The Modern Jade Dot and Line
This design is all about simplicity and modern aesthetics. It uses strategic placement of small dots and clean lines to evoke the elegance of jade without being overtly imitative.
What You’ll Need:
- Opaque jade green nail polish
- White nail polish
- Gold or silver accent polish (or nail art pen)
- Dotting tool or toothpick
- Fine nail art brush
- Base coat and top coat
Step-by-Step Tutorial:
- Prep and Base: Start with a base coat.
- Apply Base Color: Paint your nails with the opaque jade green polish. Let it dry completely.
- Add White Elements: Using a fine nail art brush or a dotting tool, add a few small white dots or a single thin white line to one or two nails. Keep the placement intentional and minimalist – think a small cluster of dots near the cuticle or a thin line across the nail.
- Incorporate Metallic Accents: With a gold or silver polish and a very fine brush, or using a nail art pen, add a tiny metallic dot on top of a white dot, or trace over the white line with a fine metallic line. This adds a sophisticated contrast. Another option is to place a single metallic dot very sparsely on an otherwise plain jade green nail.
- Balance and Seal: Apply these accents sparingly to just one or two nails for maximum impact. Ensure everything is completely dry before applying a protective top coat over all nails.
This design is perfect for those who appreciate clean lines and subtle details. It’s a way to incorporate the serene jade aesthetic into a more contemporary nail art style.
Caring for Your Jade Nail Designs
To make your beautiful jade nail designs last longer and keep them looking their best, follow these simple care tips:
- Always Use a Top Coat: This is your first line of defense against chipping and fading. Reapply every 2-3 days if needed for extra protection.
- Moisturize Regularly: Keep your cuticles and hands hydrated with cuticle oil and hand cream. Dry skin can make manicures look less polished.
- Wear Gloves: When doing chores, especially washing dishes or cleaning, wear gloves. Harsh chemicals and prolonged water exposure can weaken polish and natural nails.
- Avoid Using Nails as Tools: Resist the urge to pick, scrape, or pry with your nails. This can chip even the most durable manicure.
- Gentle Removal: When it’s time to change your polish, use an acetone-free nail polish remover to minimize dryness and damage to your nails and cuticles.
Table: Best Jade Nail Polish Shades by Finish
Choosing the right polish is key to achieving the perfect jade effect. Here’s a guide to popular finishes:
| Finish Type | Description | Best For | Nailerguy Tip |
|---|---|---|---|
| Creamy/Opaque | Smooth, full coverage color without shimmer. | Base colors, solid emerald looks, geometric designs. | Ensure even application for a flawless look. |
| Sheer/Translucent | Light, buildable coverage that allows some of the nail to show through. | Milky jade effects, layered looks, creating depth. | Apply 2-3 thin coats for best translucent effect. |
| Shimmer/Iridescent | Contains fine particles that reflect light for a subtle glow. | Adding luminosity, ethereal jade effects. | Pairs beautifully with sheer finishes for enhanced depth. |
| Metallic | High shine with a reflective, foiled appearance. | Accents, lines, geometric details, luxury pops. | Use sparingly for high impact; looks gorgeous with jade tones. |
Table: Common Jade Nail Design Challenges & Solutions
Even the simplest designs can have their hiccups. Here are common issues and how to fix them:
| Problem | Why It Happens | Easiest Solution |
|---|

