Discover 6 essential JBeauty nail designs perfect for beginners. These chic and minimalist looks offer a touch of Japanese elegance, focusing on clean lines, subtle colors, and effortless style. Learn simple techniques to achieve these trending manicures at home.
Welcome, nail lovers! Have you ever admired those perfectly polished, effortlessly chic nails that just exude sophistication? Often, you might see them and think, “That looks amazing, but it’s way too complicated for me to do myself!” It’s totally normal to feel that way when browsing through stunning JBeauty (Japanese Beauty) nail art. The good news? Achieving that elegant JBeauty aesthetic doesn’t require pro skills or super intricate designs. It’s all about embracing simplicity, clean finishes, and thoughtful details. We’re here to show you that with a few easy tricks and some basic tools, you can absolutely rock these beautiful, minimalist looks right at home. Get ready to transform your nails into little works of art that are both stylish and totally achievable!
In this guide, we’ll walk you through six essential JBeauty nail designs that are perfect for beginners. We’ll cover everything from the must-have tools to simple step-by-step instructions. You’ll learn how to create looks that are on-trend, inspired by the clean and elegant JBeauty philosophy, and best of all, totally doable for anyone. Let’s dive in and discover your next favorite manicure!
What is JBeauty Nail Design?
JBeauty nail design, much like the broader Japanese beauty philosophy, centers around a few key principles: sophistication, subtlety, and a focus on healthy, natural-looking beauty. It’s not about loud, flashy art, but rather about creating refined, elegant manicures that enhance your natural look. Think clean lines, delicate details, soft color palettes, and a flawless, glossy finish. It’s about understated chic that speaks volumes.
Key characteristics of JBeauty nails often include:
- Minimalism: Less is often more. Designs are typically simple and uncluttered.
- Subtle Colors: Neutrals, pastels, sheer polishes, and muted tones are favored.
- Flawless Finish: A high-gloss top coat is essential for that polished, “expensive” look.
- Delicate Embellishments: If there are accents, they are usually small, like tiny pearls, subtle glitter, or fine lines.
- Focus on Health: Often, JBeauty nails emphasize perfectly shaped and healthy-looking natural nails or a flawless gel application.
For beginners, this translates to achievable designs that don’t require a steady hand for complex patterns. The focus is on beautiful color application, clean edges, and simple, elegant touches.
Essential Tools for Your JBeauty Manicure
Before we jump into the designs, let’s gather your tools! You don’t need a professional salon’s worth of supplies to create stunning JBeauty nails. Here are the essentials you’ll want to have on hand:
| Tool | Purpose | Beginner Tip |
|---|---|---|
| Nail File & Buffer | To shape your nails and smooth out any ridges for a polished surface. | Look for a fine-grit buffer (around 240 grit or higher) for a gentle shine without over-filing. |
| Cuticle Pusher & Nippers | To gently push back cuticles and trim any excess skin for a clean nail bed. | Always be gentle! Pushing cuticles back without cutting is usually enough for a neat look. |
| Base Coat | Protects your natural nails from staining and helps polish adhere better. | A good base coat is crucial for a long-lasting manicure. |
| Nail Polish Colors | Your chosen shades! For JBeauty, think neutrals, pastels, sheer pinks, whites, and muted tones. | Start with just 2-3 colors you love. A sheer pink and a clean white are great JBeauty staples. |
| Detailing Brushes (Optional) | For adding thin lines or small accents. | A fine-tipped brush or even a toothpick can work for simple lines. |
| Top Coat | To seal your polish, add shine, and prevent chipping. | A quick-dry top coat is a lifesaver for busy people! |
| Cuticle Oil | To hydrate and nourish your cuticles after your manicure. | Apply this last for healthy-looking hands and nails. |
| Lint-Free Wipes | To remove dust and oil before polishing without leaving fibers behind. | Paper towels can leave little bits behind, so these are worth it! |
Having these basics will set you up for success. Remember, quality tools make a difference, but you can start with affordable options and upgrade as you get more comfortable.
6 JBeauty Nail Designs for Beginners
Now for the fun part! Let’s explore six beautiful and easy JBeauty nail designs that are perfect for trying out at home.
1. The “Milky White” Manicure
This is the quintessential JBeauty look: clean, chic, and effortlessly sophisticated. A milky white polish gives a soft, opaque, almost “frosted” look that’s incredibly flattering and versatile. It’s perfect for any occasion and makes your nails look impeccably well-maintained.
Why it’s great for beginners:
- Requires only one color.
- Focus is on smooth application.
- Universally flattering.
How to achieve it:
- Prep: Start with clean, filed nails. Push back your cuticles for a neat nail bed.
- Base Coat: Apply one thin layer of your favorite base coat and let it dry completely.
- Color Application: Apply your milky white polish. You’ll likely need two thin coats for full opacity. Let each coat dry thoroughly between applications. For a streak-free finish, use thin, even strokes and avoid going over the same area too many times once it starts to set.
- Top Coat: Once your second color coat is dry, apply a generous layer of high-gloss top coat. This is key to achieving that beautiful JBeauty shine!
- Finishing Touch: Apply cuticle oil for hydration.
Pro Tip: If you find your milky white polish streaky, try adding a tiny bit of nail polish thinner to the bottle. Sometimes, this can help restore the polish’s consistency. You can learn more about nail polish care and extensions from resources like the Nailpro educational articles which often touch upon maintaining polish quality.
2. The Subtle French Manicure
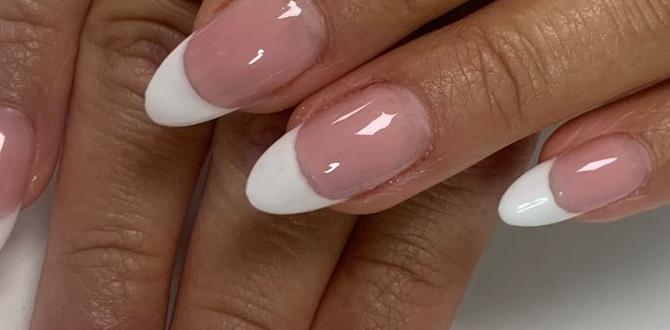
Forget the harsh white tips of the past! The JBeauty take on the French manicure is delicate and modern. Instead of opaque white, we use a sheer pink base with a very fine, often milky or off-white, tip line. It’s a subtle enhancement that makes your nails look naturally beautiful and elongated.
Why it’s great for beginners:
- Minimalist and elegant.
- Doesn’t require perfect white lines.
- Enhances natural nail appearance.
How to achieve it:
- Prep: Clean and shape your nails. Gently push back cuticles.
- Base Coat: Apply a sheer pink or nude base coat. This gives a healthy look to the nail bed. You might need two coats for a bit more color.
- Tip Line: This is where the subtlety comes in. Use a very fine brush or even the edge of your polish bottle to carefully paint a thin, curved line along the free edge of your nail. For a JBeauty look, opt for a soft, milky white or even a very light beige rather than stark white. If freehanding is tricky, you can use silicone nail guides or even a piece of tape.
- Top Coat: Seal the deal with a clear, glossy top coat.
- Hydrate: Finish with cuticle oil.
Beginner Hack: If painting a clean line is challenging, try using a nail stamper and a fine line stamper plate for a perfectly even curve each time. Or, use a striping tape to create sharp edges before you apply your tip color!
3. The “Sheer & Shine” Look
This design is all about embracing the natural beauty of your nails with a touch of polish. It relies on sheer, jelly-like polishes that give a hint of color and a lot of shine. It’s the ultimate low-maintenance, high-impact look that makes your nails appear healthy, hydrated, and perfectly polished.
Why it’s great for beginners:
- Super easy application – streaks are less noticeable.
- Requires minimal colors.
- Looks polished with very little effort.
How to achieve it:
- Prep: Start with perfectly clean and filed nails.
- Base Coat: A good base coat is essential to protect your nails, especially if using any color.
- Sheer Polish: Apply one or two thin coats of a sheer polish. Popular JBeauty sheer shades include soft pinks, peachy nudes, or a pale, milky lilac. The goal is a translucent wash of color. These polishes are very forgiving, making them ideal for beginners.
- Glossy Top Coat: Apply a generous amount of high-shine, clear top coat. This amplifies the “jelly” effect and gives that signature JBeauty gleam.
- Final Touch: Nourish your cuticles with oil.
The JBeauty Difference: It’s not just about color; it’s about the finish. Ensure your top coat is super glossy. Look for top coats specifically designed for high shine.
4. Minimalist Pearls / Tiny Charms
This design takes a simple base color (like the Milky White or Sheer & Shine) and adds one or two tiny embellishments for a touch of elegance. Think a single tiny pearl at the base of the nail, or a minuscule metallic stud. It’s the perfect way to elevate a plain manicure without going overboard.
Why it’s great for beginners:
- Only requires one accent element per nail (or even just on one nail).
- The embellishment does the “art” for you.
- Adds a sophisticated flair.
How to achieve it:
- Base Manicure: Start with your chosen base color. This could be a milky white, a sheer nude, a soft pastel, or even a clean nude polish. Ensure it’s completely dry.
- Apply Embellishment: Using a dotting tool or tweezers, pick up a tiny pearl, stud, or bead. Apply a small dot of strong nail glue or a bit of top coat to the spot on your nail where you want the embellishment to go. Gently press the charm onto the wet glue/top coat.
- Seal It In: Carefully apply a thin layer of top coat around the embellishment, avoiding flooding it. You want to secure it without losing its shine. For added security, you can apply a tiny bit of top coat directly to the edges of the charm after it’s set.
- Finish: Apply top coat to all nails and follow with cuticle oil.
Placement is Key: JBeauty often uses these accents sparingly and strategically. A single pearl at the cuticle line or a tiny metallic dot near the center of the nail are common placements. For more information on nail art components, you might find resources about cosmetic product safety regulations helpful, as it underscores the importance of safe application of any nail accessories.
5. The Gradient “Nude Fade”
A softer, more blended version of the French tip, the gradient or “fade” look is incredibly chic and modern. It involves blending a sheer nude or pink at the cuticle into a slightly lighter shade towards the tip, or vice-versa. It creates a beautiful, seamless transition that looks sophisticated and polished.
Why it’s great for beginners:
- Blended look is more forgiving than sharp lines.
- Uses soft, natural colors.
- Visually elongates the nail.
How to achieve it:
- Prep: Clean and shape your nails. Ensure cuticles are neat.
- Base Coat: Apply a thin coat of clear base coat.
- First Color: Apply your base nude or sheer pink polish. Let it dry completely.
- Create the Gradient: For a simple gradient, you can use a makeup sponge. Apply a strip of your base color and a lighter shade (or white) next to it on a clean surface (like a piece of paper). Dab your sponge into the polish colors, then gently dab onto the nail to blend the colors. You’ll likely need 2-3 dabs to build coverage.
- Alternative Method: Another easy way is to apply your base color, then use a slightly lighter shade near the tip and very gently blend the edges with a thin brush or the applicator from the polish bottle.
- Top Coat: Once the gradient is dry, apply a generous, smoothing top coat to meld the layers and add shine.
- Hydrate: Finish with cuticle oil.
Tip for Smoothness: If you notice any texture from the sponge or blending, a good, thick top coat can smooth it out beautifully. You want the transition to be as seamless as possible.
6. The Delicate Line Art
This design adds a touch of modern artistry with the simplest of strokes. Think a single, thin black or metallic line drawn horizontally across the nail, diagonally, or vertically near the cuticle. It’s a bold yet minimalist statement that’s surprisingly easy to achieve.
Why it’s great for beginners:
- Requires only one accent color.
- Focuses on one simple element.
- Instantly elevates a plain manicure.
How to achieve it:
- Base Color: Apply your base polish – a nude, milky white, pale pink, or even a light gray works wonderfully. Let it dry completely.
- The Line: Use a fine-tipped nail art brush or a striping tool. Dip it into your accent color (black, gold, silver, or white are popular choices). Gently draw your desired line. For a clean JBeauty look, a single horizontal line just off-center, a diagonal line from one corner, or a very fine vertical line near the cuticle are excellent choices.
- Steady Hand Tip: Rest your wrists on a stable surface to keep your hands steady. You can also use a piece of tape as a guide if drawing a straight line is difficult.
- Top Coat: Carefully apply a clear top coat over the entire nail to seal the design and add shine.
- Final Polish: Finish with cuticle oil.
Material Matters: For perfect fine lines, consider investing in a dedicated nail art polish that has a very thin brush, or a liner pen. These are specifically designed for creating precise designs. For instance, brands like Kokoist or Leafgel offer specialized liner gels that are great for this type of art and used widely in professional J-nail salons.
Achieving that JBeauty Shine: The Power of Top Coat
No matter which JBeauty design you choose, one element is non-negotiable: the top coat! Japanese nail artistry emphasizes a flawless, high-shine finish. This isn’t just about aesthetics; a good top coat also protects your manicure from chipping and fading, making it last longer.
Here’s what to look for:
- High-Gloss Formula: Opt for top coats labeled “high shine,” “mirror finish,” or “gel-like finish.”
- Thick, Smoothing Formula: A slightly thicker top coat can help smooth out any minor imperfections in your polish application, creating a flawless canvas.
- Quick-Dry Options: If you’re short on time, a good quick-dry top coat is a lifesaver.
- No-Wipe Gel Top Coats: If you’re using gel polish, a no-wipe top coat saves an extra step and provides incredible shine.
Applying your top coat properly is just as important as the color. Ensure you cap the free edge of your nail by running the brush along the very tip of your nail. This seals in the color and prevents chipping.
FAQ: Your JBeauty Nail Questions Answered
Q1: What are the most popular JBeauty nail colors?
A1: JBeauty favors soft, natural, and muted tones. Think milky whites, sheer pinks, pale nudes, soft


