Mastering 3D nail design is easier than you think! This guide breaks down essential steps for creating stunning, dimensional nail art at home. We’ll cover tools, techniques, and simple ideas perfect for beginners looking to add flair to their manicure.
Ever scroll through amazing nail art online and think, “Wow, I could never do that!”? If you’re dreaming of adding that extra pop and dimension to your nails, you’re in the right place! 3D nail designs might look super fancy, but they’re totally achievable with the right guidance.
Sometimes, flat nail art just doesn’t give that wow factor you’re after. You want something that catches the light, stands out, and really shows off your creative side. The good news? You don’t need to be a pro artist to create beautiful 3D effects. With a few key tools and simple techniques, you can transform your nails into tiny works of art.
Let’s dive into making those gorgeous 3D nail designs a reality, step by step. Get ready to impress yourself and everyone around you!
Your Essential Toolkit for 3D Nail Designs
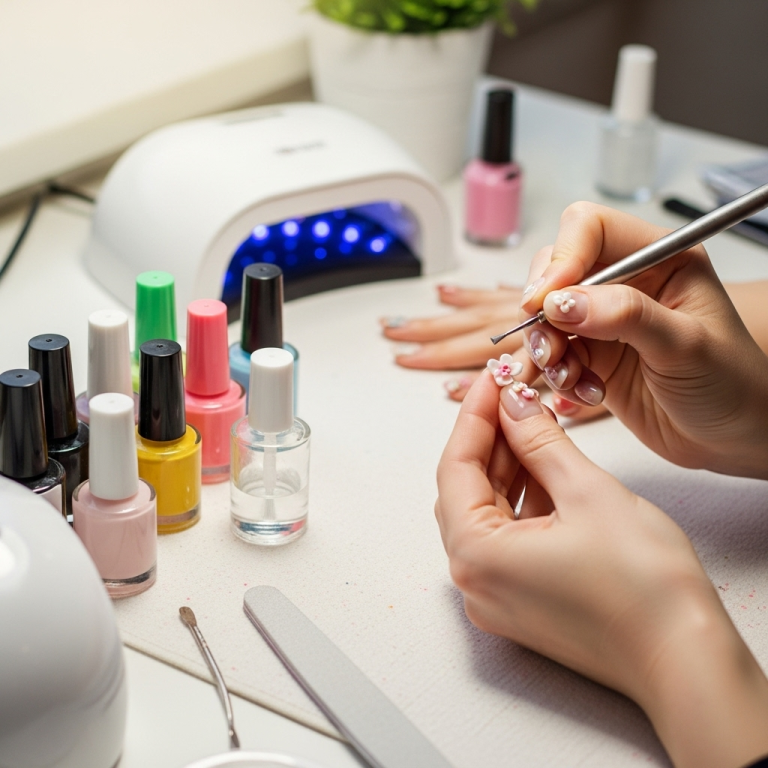
To create those eye-catching 3D nail designs, having the right tools makes all the difference. Don’t worry, you don’t need a professional salon’s worth of equipment. A few key items will have you well on your way to creating amazing textures and effects.
The Must-Have Tools:
- UV/LED Lamp: This is crucial for curing gel polishes and 3D gels, ensuring your designs are durable and long-lasting.
- Nail Polish/Gel Colors: A selection of your favorite colors is essential. For 3D, consider having a good clear gel or a builder gel.
- 3D Gel or Acrylic: These products are thicker and designed to hold their shape, perfect for sculpting. Some gels are specifically labeled for 3D art.
- Detail Brushes: You’ll need fine-tipped brushes for applying gel precisely and creating intricate details. Look for brushes with different tip shapes (round, flat).
- Dotting Tools: These come in various sizes and are great for creating small dots, swirls, and adding dimension.
- Tweezers: Useful for picking up small embellishments like rhinestones, caviar beads, or glitter.
- Nail File and Buffer: For shaping and preparing your nail surface for optimal adhesion.
- Cleanser/Rubbing Alcohol: To remove the sticky inhibition layer from gel polish after curing and to clean your brushes.
- Top Coat and Base Coat: These protect your natural nail and seal your design.
Having these basics will give you the flexibility to explore many different 3D techniques. Each tool plays a specific role in building up layers and adding texture.
Genius Essential Steps: Creating Your First 3D Nail Design
Ready to bring your nail art dreams to life? Follow these steps to create your first 3D nail design. We’ll keep it simple and focus on building a beautiful, yet manageable, effect.
The beauty of 3D nail art is its versatility. You can create anything from subtle textures to bold, sculpted elements. For beginners, starting with simple shapes and building up complexity is the best way to learn.
Step 1: Prep Your Nails
- Start with clean, dry nails. Push back your cuticles gently.
- Shape your nails using a nail file.
- Lightly buff the surface of your nails to remove any shine. This helps products adhere better.
- Wipe your nails with a cleanser or rubbing alcohol to remove dust and oils.
- Apply a thin layer of base coat and cure it under your UV/LED lamp according to the product instructions.
Step 2: Apply Your Base Color
- Apply one or two thin coats of your chosen nail polish or gel color.
- Cure each coat thoroughly under the UV/LED lamp. Make sure your color is fully set before moving on.
Step 3: Sculpt Your 3D Element
This is where the magic happens! We’ll use a 3D gel or builder gel for this example, as they are designed to hold their shape.
- Option A: Flowers/Petals:
- Take a small bead of 3D gel with your detail brush.
- Gently dab and spread the gel onto the nail to create a petal shape. You can manipulate the gel to make it thicker in the center and thinner on the edges.
- Repeat to create multiple petals, forming a flower.
- Pro Tip: Use a small amount of product. It’s easier to add more than to remove excess.
- Option B: Simple Texture/Dots:
- Use a dotting tool or the tip of your detail brush to pick up a small amount of 3D gel.
- Place deliberate dots or small lines onto the nail. You can arrange them in a pattern or create slightly raised textures.
- Tip: For raised dots, place the gel and then gently pull your tool away to create a bit of a peak.
Step 4: Add Embellishments (Optional)
This step can take your 3D design to the next level. Rhinestones, glitter, or tiny charms can be embedded into the wet gel before curing, or adhered with gel glue afterwards.
- If you’re embedding into wet gel:
- Carefully place your embellishments using tweezers onto the still-uncooked 3D gel.
- Gently press them in so they are slightly submerged.
- Cure the nail again under the lamp.
- If you’re adding them after curing the 3D element:
- Apply a small dot of clear gel or gel glue where you want to place your embellishment.
- Place the embellishment using tweezers.
- Cure the nail one last time.
Step 5: Finish with Top Coat
- Apply a thin, even layer of top coat over the entire nail, making sure to cap the free edge. Be careful not to flood your 3D elements, which can smooth them out. You might need to use a smaller brush to meticulously apply top coat around raised designs.
- Cure your top coat under the UV/LED lamp.
- If your top coat leaves a sticky residue (inhibition layer), gently wipe it away with a cleanser or rubbing alcohol on a lint-free wipe.
And voilà! You’ve created your first 3D nail design. Remember, practice makes perfect. Don’t be discouraged if your first try isn’t magazine-ready. Every attempt helps you get better!
Popular 3D Nail Design Ideas for Beginners
Ready to get creative? Here are some beginner-friendly 3D nail design ideas that are relatively simple to execute but deliver maximum impact. These designs focus on achievable techniques and can be adapted to many color palettes.
1. Sculpted Flowers and Leaves
This is a classic for a reason! Using 3D gel, you can sculpt delicate petals and simple leaf shapes. You can create a single statement flower on one nail or a scattering of small blossoms across all your fingers.
How-to:}
- Use a detail brush to pick up a small bead of 3D gel.
- Dab and swirl the gel onto the nail to form a petal shape.
- Create several petals to form a flower. You can slightly overlap them for a fuller look.
- For leaves, create a teardrop shape and gently flatten one end.
- Cure after sculpting your elements.
2. Textured Geometric Shapes
This modern look involves creating raised lines, dots, or simple squares and rectangles. It’s abstract and can look incredibly chic.
How-to:
- Using a fine detail brush and 3D gel, draw clean lines or create small cubes on a cured polish base.
- You can create a series of parallel lines for a ribbed effect or a grid pattern.
- Cure promptly after creating your shapes.
3. Raised Dots and Pearls
This is one of the simplest ways to add dimension. Think of it as an elevated version of a classic polka dot or a string of pearls.
How-to:
- Use a dotting tool or the tip of your detail brush.
- Pick up a small amount of 3D gel.
- Place dots on your nail. For a slightly raised effect, dab and pull the tool away gently.
- For a “pearl” effect, you can create slightly elongated dots.
- Cure the dots before applying top coat.
4. Simple Bows
A cute bow can add a sweet touch to any manicure. You can sculpt these using 3D gel.
How-to:
- Using a detail brush, sculpt two loops with 3D gel to form the sides of the bow.
- Then, create a smaller bead for the center knot.
- Cure the bow elements.
5. Glitter Encapsulation with Texture
While not strictly “sculpted” 3D, encapsulating glitter with a thick, clear gel or builder gel can create a smooth, raised dome-like effect over glitter. This protects the glitter and adds a smooth, glassy dimension.
How-to:
- Apply your nail color and cure.
- Apply a layer of clear gel or builder gel. Sprinkle desired glitter onto the wet gel.
- Apply another layer of clear gel or builder gel to encapsulate the glitter. Ensure this layer is thick enough to create a smooth, domed surface once cured.
- Cure thoroughly. This technique creates a smooth, dimensional finish instead of individual raised elements.
Advanced Techniques to Explore Later
Once you’ve got the hang of the basics, there’s a whole world of advanced 3D nail art techniques to explore. These might require a bit more practice and specialized products, but the results are absolutely stunning. Don’t feel you need to master these immediately; they are great goals for when you feel more confident with 3D gels.
1. Acrylic Flowers (2D to 3D)
Acrylic art is a traditional method for creating intricate 3D flowers and extensions. It involves using acrylic powder and monomer liquid to sculpt petals and shapes directly on the nail.
Key aspects:
- Requires specific acrylic products (powder and liquid).
- Involves precise brush control to create petal layers and dimensions.
- Can be air-dried or cured if using a UV-curable acrylic.
- Offers incredible durability and intricate detail possibilities.
For those interested in learning more about the chemistry behind acrylics, resources like the National Institute of Standards and Technology (NIST) on Polymers offer fundamental insights into the materials used in many beauty products.
2. Sugar Art Effects
This technique uses fine sugar-like granules or textured powders applied with gel to create raised surfaces that mimic fabric textures, frost, or sugary coatings.
Key aspects:
- Often created by applying 3D gel or clear gel and then sprinkling finely crushed acrylic nails (often called “sugar powder”) over it.
- The powder adheres to the gel, creating a matte, textured finish.
- Can be combined with other 3D elements for a mixed-media effect.
3. 3D Stamping
This involves using special 3D stamping plates and a stamper to pick up a design and then layer it or apply it in a way that creates depth. Some techniques involve filling in stamped outlines with gels or acrylics.
Key aspects:
- Uses specialized 3D stamping plates and stamper.
- Designs can be layered for more depth.
- Often combined with color filling for a more dimensional look.
4. Rhinestone and Jewel Art
While we touched on this, advanced jewel art involves strategic placement of various sizes and shapes of rhinestones, gems, and studs to create complex 3D patterns, faces, or even miniature sculptures. Using different types of adhesives and embedding techniques is key.
Key aspects:
- Focuses on strategic placement of various bling elements.
- Often involves using a strong gel adhesive or builder gel to secure.
- Can create intricate mosaics or standalone sparkling features.
5. Wired Designs and Charms
This technique involves bending thin jewelry wire into shapes or attaching small metal charms to the nail using gel. These can create unique, delicate structures.
Key aspects:
- Utilizes thin craft wire or pre-made charms.
- Wire is bent and sculpted directly on the nail or attached.
- Charms are secured with a strong adhesive gel.
Tips for Long-Lasting 3D Nail Designs
You’ve poured your creativity into creating a stunning 3D nail design, and you want it to last! Proper care and application are key to ensuring your beautiful work stays intact. Here are some tips:
Application Essentials:
- Proper Nail Prep is Non-Negotiable: A clean, oil-free, and lightly buffed nail surface is the foundation. This ensures your base coat and, consequently, your 3D elements adhere without lifting.
- Thin Layers of Polish: While 3D elements are thick, your base color and top coat should be applied in thin, even layers. Thick layers can lead to premature chipping or peeling.
- Full Curing: Always cure each layer (base, color, 3D gel, top coat) for the recommended time under a quality UV/LED lamp. Under-curing is a common cause of lifting and cracking. For 3D elements, ensure your lamp can reach the base of the design.
- Don’t Flood Your Designs: When applying top coat over 3D elements, be careful not to use too much product. If the top coat is too thick or floods the design, it can smooth out the 3D texture you worked hard to create. Use a detail brush for precision around raised elements.
- Cap the Free Edge: Always “cap” the free edge of your nail with every layer (base coat, color, top coat). This seals the edge and prevents lifting and chipping.
Daily Care:
- Be Mindful of Your Hands: Treat your nails gently. Avoid using them as tools (e.g., to open cans).
- Wear Gloves: When doing household chores involving water, chemicals, or excessive scrubbing (like washing dishes or cleaning), wear rubber gloves. Prolonged exposure to water and harsh chemicals can weaken the adhesion of nail products.
- Moisturize: Keep your cuticles and the skin around your nails hydrated with cuticle oil or hand cream. Healthy skin supports healthy nails and can prevent dryness that might lead to lifting.
- Avoid Harsh Chemicals: Be cautious with acetone-based removers, especially if they are not specifically formulated for gel polish remover.
- Regular Maintenance: If you notice any lifting or minor damage early on, it’s better to try and repair it immediately rather than waiting for it to worsen.
Adhering to these tips will significantly extend the life of your beautiful 3D nail designs, allowing you to enjoy them for longer!
Troubleshooting Common 3D Nail Design Issues
Even with the best intentions, sometimes things don’t go exactly as planned. Don’t worry! Every nail artist encounters little hiccups along the way. Here are some common problems and easy fixes for your 3D nail designs:
Problem: My 3D Gel Isn’t Holding Its Shape
- Possible Cause: Using a gel that is too thin or not designed for 3D sculpting. Also, too much product can make it sag.
- Solution: Ensure you’re using a product specifically labeled as “3D gel,” “sculpting gel,” or “builder gel” that has a thicker consistency. Use smaller amounts of product at a time.
Problem: My 3D Designs Are Lifting or Peeling Off
- Possible Cause: Improper nail prep (oils, dust), under-curing, or not capping the free edge


